Free After Effects Expression
Stop Writing Expressions Manually – Use This Free Script Instead
Are you tired of copying and pasting the same After Effects expressions over and over? Want to add professional animations like wiggle, pulse, and bounce effects without memorizing code? This free Expression Applier script gives you instant access to 18+ pre-built expressions with just one click.
Perfect for motion designers, video editors, and content creators who want to speed up their workflow and create stunning animations effortlessly.
What is the Expression Applier Script?
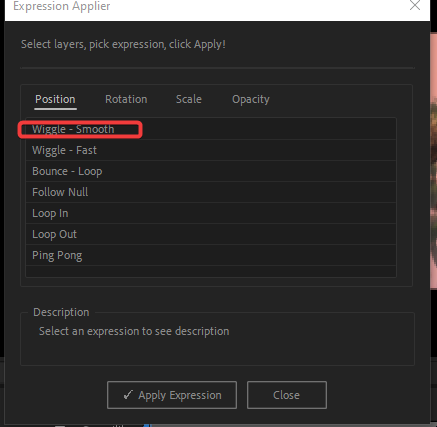
The Expression Applier is a free After Effects automation script that provides a library of commonly-used expressions. Instead of typing or copying code, you simply:
- Select your layers
- Choose an expression from the library
- Click “Apply”
- Done! ✅
Why You Need This Script
✅ Save Time – No more googling expressions or searching old projects ✅ No Coding Required – User-friendly interface for beginners ✅ 18+ Professional Effects – Wiggle, bounce, pulse, loop, and more ✅ Batch Apply – Add expressions to multiple layers at once ✅ Organized Categories – Position, Rotation, Scale, and Opacity tabs ✅ See Descriptions – Know what each expression does before applying
Expression Library – What’s Included
🎯 Position Expressions (Movement)
Wiggle – Smooth
- Creates gentle, natural random movement
- Perfect for: Floating elements, breath effects, subtle animation
- 2 wiggles per second with 30px movement
Wiggle – Fast
- Rapid, jittery movement effect
- Perfect for: Glitch effects, nervous energy, camera shake
- 5 wiggles per second with 50px movement
Bounce – Loop
- Continuous up and down bouncing
- Perfect for: Ball bounces, floating objects, playful animations
- Loops forever at 2 bounces per second
Follow Null
- Links position to a controller null layer
- Perfect for: Complex animations, parent controls, rigging
- Requires a null layer named “Controller”
Loop In / Loop Out / Ping Pong
- Repeats your keyframe animations automatically
- Perfect for: Seamless loops, repeating patterns
- Requires at least 2 keyframes
🔄 Rotation Expressions (Spinning)
Spin – Clockwise
- Continuous 360° rotation every second
- Perfect for: Wheels, gears, loading spinners, clock hands
- Smooth constant rotation
Spin – Counter-Clockwise
- Reverse direction spinning
- Perfect for: Counter animations, opposite rotations
- Negative rotation value
Wiggle Rotation
- Random rotation shake effect
- Perfect for: Drunk effect, vibration, unstable objects
- 3 wiggles per second, ±15° range
📏 Scale Expressions (Size)
Pulse
- Fast, rhythmic growing and shrinking
- Perfect for: Heartbeats, music sync, attention-grabbing
- 2 pulses per second with ±20% scale
Breathing
- Slow, subtle size variation
- Perfect for: Living objects, organic feels, calm animations
- 1 breath per second with ±5% scale
Random Scale
- Unpredictable size changes
- Perfect for: Glitch, digital effects, randomization
- 1 wiggle per second, ±10% variation
Audio React
- Scales based on audio amplitude
- Perfect for: Music visualizers, sound-reactive graphics
- Requires audio layer named “Audio”
👁️ Opacity Expressions (Visibility)
Blink
- Random on/off flashing effect
- Perfect for: Warning lights, digital displays, blinking eyes
- Unpredictable timing
Fade Loop
- Smooth continuous fading in and out
- Perfect for: Breathing lights, pulsing glow, attention effects
- 1 cycle per second, 0-100% opacity
Flicker
- Rapid random opacity changes
- Perfect for: Old film, broken lights, static interference
- 70-100% opacity range
How to Install the Expression Applier Script
Step 1: Download and Save the Script
- Copy the script code
- Open a text editor (Notepad on Windows, TextEdit on Mac)
- Paste the code
- Save as
ExpressionApplier.jsx(make sure it has .jsx extension)
Step 2: Install in After Effects
Windows:
C:\Program Files\Adobe\Adobe After Effects [version]\Support Files\Scripts
Mac:
/Applications/Adobe After Effects [version]/Scripts
Step 3: Enable Scripting
- Open After Effects
- Go to Edit > Preferences > Scripting & Expressions
- Check “Allow Scripts to Write Files and Access Network”
- Restart After Effects
How to Use: Complete Tutorial
Basic Usage (Single Layer)
[Screenshot placeholder: After Effects timeline with layer selected]
- Select a layer in your composition timeline
- Go to File > Scripts > Run Script File
- Browse to
ExpressionApplier.jsxand open it - The Expression Applier window opens
- Click a tab (Position, Rotation, Scale, or Opacity)
- Select an expression from the list
- Read the description at the bottom
- Click “Apply Expression”
- Your layer now has the expression applied!
Advanced Usage (Multiple Layers)
[Screenshot placeholder: Multiple layers selected]
Apply to multiple layers at once:
- Select multiple layers (Shift+Click or Ctrl/Cmd+Click)
- Run the script
- Choose your expression
- Click Apply
- Expression applies to ALL selected layers instantly! ✨
Pro Tip: This is perfect for creating uniform effects across text layers, shape layers, or graphic elements.
Understanding the Interface
[Screenshot placeholder: Script interface with tabs]
Four Main Tabs:
- Position Tab – Movement and location expressions (7 options)
- Rotation Tab – Spinning and rotation effects (3 options)
- Scale Tab – Size and growth expressions (4 options)
- Opacity Tab – Visibility and fade effects (3 options)
Description Panel: Shows what each expression does before you apply it – no guessing.
Download script file from this linkhttps://drive.google.com/file/d/1u_DJPmWV5a-XGoxzbmXNj53OqYuvGwyd/view?usp=sharing. i will approve your access request.
Real-World Use Cases
Use Case 1: Social Media Graphics
Scenario: Creating an Instagram story with 10 text layers
- Select all text layers
- Apply “Wiggle – Smooth” for subtle movement
- Result: Professional floating text effect in 5 seconds
Use Case 2: Logo Animation
Scenario: Making your logo pulse with energy
- Select logo layer
- Apply “Pulse” from Scale tab
- Result: Rhythmic heartbeat effect that loops forever
Use Case 3: Music Visualizer
Scenario: Creating audio-reactive bars
- Create 20 rectangle shape layers
- Import your audio as “Audio” layer
- Select all rectangles
- Apply “Audio React” expression
- Result: Bars that dance to your music!
Use Case 4: Loading Spinner
Scenario: Creating a loading icon
- Draw a circular shape with anchor point off-center
- Apply “Spin – Clockwise”
- Result: Perfect loading animation, no keyframes needed
Use Case 5: Glitch Effect
Scenario: Adding glitch to text
- Duplicate text layer 3 times
- Select all copies
- Apply “Wiggle – Fast” to position
- Apply “Flicker” to opacity
- Result: Intense glitch effect
Pro Tips and Tricks
Tip 1: Customize After Applying
Expressions aren’t locked! After applying:
- Select the layer
- Press E to reveal expressions
- Alt+Click (Win) or Option+Click (Mac) on the stopwatch
- Edit the expression values
Example: Change wiggle speed
// Original
wiggle(2, 30);

// Modified for faster wiggle
wiggle(5, 30);
Tip 2: Combine Multiple Expressions
You can layer effects:
- Apply “Spin – Clockwise” to Rotation
- Apply “Wiggle – Smooth” to Position
- Apply “Pulse” to Scale
- Result: Complex, multi-dimensional animation!
Tip 3: Control Expression Intensity
Modify the values in the expression:
Wiggle:
wiggle(frequency, amplitude)- Higher frequency = faster shaking
- Higher amplitude = bigger movement
Pulse/Breathing:
freq = 2;– Change number for faster/sloweramp = 20;– Change for more/less intensity
Tip 4: Time-Based Expressions
For expressions that run forever (wiggle, pulse, spin), you can add time limits:
// Only wiggle for first 3 seconds
if (time < 3) {
  wiggle(2, 30);
} else {
  value;
}
Tip 5: Audio Reactive Setup
For “Audio React” to work:
- Import your audio file
- Rename the audio layer to exactly “Audio”
- Apply the expression to Scale
- Adjust the
amp = 200;value for sensitivity
Troubleshooting Common Issues
Problem: Script Window Doesn’t Open
Solutions:
- Check if scripting is enabled in Preferences
- Make sure file has .jsx extension
- Try restarting After Effects
- Verify file is in the Scripts folder
Problem: “No Composition Found” Error
Solution:
- Make sure you have a composition open
- The composition must be active (highlighted)
- Click on the comp timeline before running script
Problem: “No Layers Selected” Error
Solution:
- Select at least one layer in your timeline
- Make sure layers aren’t locked
- Shy layers still work if selected
Problem: Expression Doesn’t Show Effect
Solutions:
- Check if you applied to correct property (Position expressions won’t affect Rotation)
- Make sure layer isn’t parented to another layer
- Verify expression has no syntax errors (red text)
- Try disabling then re-enabling the expression
Problem: “Audio” Layer Not Found (Audio React)
Solution:
- Your audio layer must be named exactly “Audio” (case-sensitive)
- Layer must be in the same composition
- Audio must have audio waveform visible
Problem: Loop Expressions Don’t Work
Solution:
- Loop expressions require keyframes to work
- You need at least 2 keyframes on the property
- Make sure keyframes have different values
Keyboard Shortcuts for Faster Workflow
Speed up your expression workflow with these shortcuts:
- U – Show all modified properties (including expressions)
- E – Show only expressions
- Alt/Opt + Click Stopwatch – Enable/disable expression
- Ctrl/Cmd + D – Duplicate layer with expressions intact
- Ctrl/Cmd + Shift + D – Split layer (expressions remain on both)
Frequently Asked Questions
Q: Does this work with After Effects 2024? A: Yes! Works with After Effects CC 2017 and all later versions including 2024.
Q: Can I use these expressions in commercial projects? A: Absolutely! These are standard After Effects expressions, free to use anywhere.
Q: Will expressions slow down my composition? A: Slightly, but modern computers handle these simple expressions easily. Audio reactive expressions are more intensive.
Q: Can I add my own expressions to the library? A: Yes! The script is customizable. Open the .jsx file and add to the expressionLibrary object following the same format.
Q: Do expressions export with my video? A: Yes! Expressions are “baked in” when you render. The animation becomes real keyframes in the final export.
Q: Can I remove an expression after applying? A: Yes. Select the layer, press E, then Alt/Opt+Click the stopwatch to remove it.
Q: What’s the difference between expressions and keyframes? A: Expressions are dynamic code that generates animation automatically. Keyframes are manual points you set. Expressions are easier for repetitive effects!
Q: Can I apply multiple expressions to one property? A: No, one expression per property. But you can apply different expressions to different properties (Position, Rotation, Scale, Opacity).
Q: Does “Follow Null” work with any null name? A: The default code looks for a null named “Controller”. You can edit the expression to use any null name.
Q: How do I make expressions loop a specific number of times? A: You’ll need to modify the expression code to add a time limit or counter. Check the “Pro Tips” section for examples.
Best Practices for Using Expressions
1. Name Your Layers Properly
Before applying expressions, use clear layer names:
- ❌ “Shape Layer 1”
- ✅ “Logo_Main”
This helps when expressions reference other layers.
2. Use Adjustment Layers for Global Effects
Apply expressions to adjustment layers to affect everything below:
- Add wiggle to adjustment layer position = everything shakes
- Add opacity flicker = entire composition flickers
3. PreCompose for Complex Setups
If you have many layers with expressions:
- Select all layers
- Right-click > Pre-compose
- Apply expressions to the precomp Result: Easier to manage and faster performance
4. Test on Short Previews First
Some expressions are CPU-intensive:
- Test on 3-5 seconds first
- If it plays smoothly, apply to full timeline
- Consider reducing complexity if laggy
5. Save Expression Presets
After customizing an expression:
- Select the property with expression
- Animation > Save Animation Preset
- Name and save
- Drag from Effects & Presets panel to reuse
Advanced Customization Guide
Creating Custom Wiggle Speeds
Modify the wiggle values for different feels:
// Subtle
wiggle(1, 10);

// Normal (default)
wiggle(2, 30);

// Aggressive
wiggle(8, 100);

// Earthquake
wiggle(20, 200);
Making Expressions Stop After Time
Add conditional timing:
// Wiggle for 5 seconds then stop
if (time < 5) {
  wiggle(2, 30);
} else {
  value;
}
Randomize Each Layer Differently
Use seedRandom() for unique randomness per layer:
seedRandom(index, true);
wiggle(2, 30);
Now each layer wiggles differently!
Link to Slider Control
For dynamic control without editing expressions:
- Add Effects > Expression Controls > Slider Control
- Modify expression:
speed = effect("Slider Control")("Slider");
wiggle(speed, 30);
Now adjust wiggle speed with a slider!
Conclusion
The Expression Applier script is a must-have tool for any After Effects user. Whether you’re a beginner learning expressions or a professional speeding up your workflow, having instant access to 18+ pre-built expressions saves countless hours.
Quick Summary:
✅ Free and easy to use – No coding required ✅ 18+ professional expressions – Position, Rotation, Scale, Opacity ✅ Apply to multiple layers – Batch processing saves time
✅ Organized interface – Tabbed categories with descriptions ✅ Customizable – Edit expressions after applying ✅ Works with all AE versions – CC 2017 and newer
What You Can Create:
- 🎬 Smooth floating animations
- 🔄 Perfect loading spinners
- 💓 Pulsing logos and text
- 🎵 Audio-reactive visualizers
- ✨ Glitch and flicker effects
- 🎯 Complex motion graphics
Stop wasting time searching for expressions online. Download the Expression Applier script today and speed up your After Effects workflow instantly!
Ready to supercharge your animations? Download the script above and start creating stunning effects in seconds!
Have questions or want more expressions added? Drop a comment below and let me know what effects you’d like to see!
imation #AdobeAfterEffects #ContentCreation #VisualEffects #MotionDesign #Automation
Leave a Reply