Add Professional SRT Captions to Your Videos in Minutes
Are you struggling to add eye-catching captions to your videos? Whether you’re creating content for YouTube, Instagram, or TikTok, this free After Effects script makes it incredibly easy to import SRT files and create stunning animated captions that keep your audience engaged.
What is the Caption Creator?
The Caption Creator is a free After Effects script that automatically converts your SRT subtitle files into beautifully animated text layers. Perfect for:
- Social media content creators
- YouTube video editors
- Punjabi language content
- Music video producers
- Educational content
- Marketing videos
Key Features
✅ Automatic SRT Import – Drag and drop your subtitle file ✅ 5 Animation Styles – Fade, Pop, Slide, Bounce, and Zoom ✅ Auto-Scaling Text – Font size adjusts to fit your box perfectly ✅ Customizable Effects – Glow, shadow, and stroke options ✅ Single Container – Move all captions together easily ✅ Bold & Readable – Enhanced text styling for maximum visibility
How to Install the Script
Step 1: Download the Script
- Copy the script code to a text editor
- Save it as
srtmaker.jsx - Place it in your After Effects Scripts folder:
- Windows:
C:\Program Files\Adobe\Adobe After Effects [version]\Support Files\Scripts - Mac:
/Applications/Adobe After Effects [version]/Scripts
- Windows:
Step 2: Enable Scripts in After Effects
- Open After Effects
- Go to Edit > Preferences > Scripting & Expressions (Windows) or After Effects > Preferences > Scripting & Expressions (Mac)
- Check Allow Scripts to Write Files and Access Network
- Restart After Effects
How to Use: Step-by-Step Tutorial
Step 1: Prepare Your SRT File
First, you need an SRT subtitle file. Here’s what it should look like:
1
00:00:01,000 --> 00:00:03,500
this is my fist video

2
00:00:03,600 --> 00:00:06,000
watch till last
Pro Tip: You can generate SRT files using:
- YouTube’s auto-caption feature
- Subtitle editing software like Aegisub
- Online SRT generators
- AI transcription tools
Step 2: Create Your Composition
- Open After Effects
- Create a new composition (recommended: 1920×1080, 30fps)
- Import your video footage
- Make sure your composition is the active/selected item
Step 3: Run the Script
- Go to File > Scripts > Run Script File
- Select
srtmaker.jsx - Browse and select your SRT file
- The settings dialog will appear
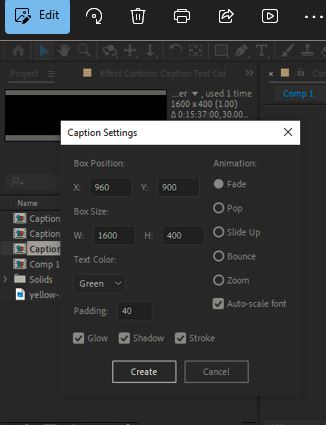
Step 4: Configure Your Caption Settings
Box Position & Size
- Position X, Y: Where the caption box appears on screen
- Default: 960, 900 (bottom center for 1920×1080)
- Adjust based on your composition size
- Size W, H: Dimensions of the caption container
- Default: 1600×400 (wide bottom banner)
- Larger = more text fits
Text Styling
- Text Color: Choose from Green, White, or Yellow
- Green works great for most content
- White for dark backgrounds
- Yellow for high visibility
- Padding: Space between text and box edges (default: 40px)
- Auto-scale Font: Automatically adjusts text size to fit
Animation Options
Choose from 5 professional animations:
- Fade – Classic smooth appearance (best for professional content)
- Pop – Dynamic scale effect (great for energetic content)
- Slide Up – Text slides from bottom (smooth and modern)
- Bounce – Playful spring effect (perfect for fun content)
- Zoom – Attention-grabbing zoom in (high-impact)
Visual Effects
- Glow: Adds a vibrant glow around text (recommended: ON)
- Shadow: Creates depth with drop shadow (recommended: ON)
- Stroke: Black outline for better contrast (recommended: ON)
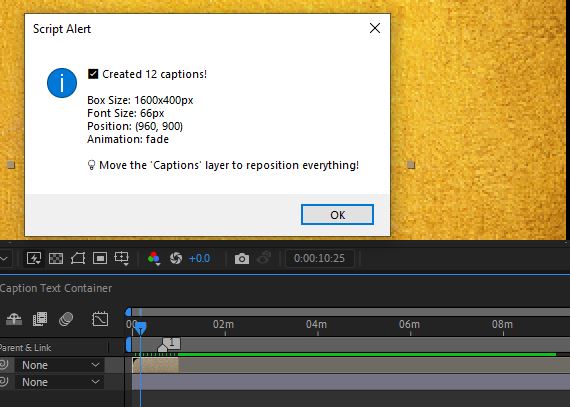
Step 5: Generate Captions
- Click Create
- Wait for the script to process (takes 5-30 seconds depending on caption count)
- You’ll see a confirmation message with details
Customizing Your Captions
Moving Captions Around
The beauty of this script is that all captions are in one container:
- Select the “Captions” precomp layer in your timeline
- Press P to reveal Position
- Drag or animate the position – all text moves together!
Adjusting Individual Captions
If you need to edit specific captions:
- Double-click the “Captions” precomp in your Project panel
- Find the caption layer you want to edit
- Modify text, position, or timing as needed
Changing Colors After Creation
- Select a text layer in the precomp
- Open Character panel (Ctrl/Cmd + 6)
- Click the fill color to change it
- Use the Edit > Select All to change all at once
Pro Tips for Better Captions
1. Optimize Box Size for Your Video Format
- YouTube/Horizontal Videos: 1600×400 at bottom
- Instagram Stories/TikTok: 800×600 centered
- Square Videos: 1000×500 at bottom third
2. Choose the Right Animation
- Tutorial/Educational: Fade (professional, not distracting)
- Music Videos: Pop or Bounce (energetic, matches beat)
- Vlogs: Slide Up (modern, smooth)
- Promotional: Zoom (attention-grabbing)
3. Font Size Matters
The script auto-scales, but you can adjust box dimensions to control text size:
- Larger box = smaller text (more words fit)
- Smaller box = larger text (fewer words, more impact)
4. Contrast is Key
- Use White text on dark videos
- Use darker colors on bright videos
- Always keep Stroke ON for maximum readability
5. Position Strategy
Common positioning:
- Bottom 10%: Standard for most content
- Top 20%: When showing products/faces at bottom
- Center: For dramatic effect or lyrics
Troubleshooting Common Issues
“No composition found” Error
Solution: Make sure you have a composition open and selected before running the script.
Captions Don’t Appear
Solution:
- Check if the layer is below your footage (move it to top)
- Verify the timing matches your SRT file
- Check if the precomp is visible and not hidden
Text is Too Small/Large
Solution:
- Adjust the box Width and Height settings
- Turn OFF auto-scale and manually set font size in the precomp
- Modify padding to give text more room
Script Won’t Run
Solution:
- Enable “Allow Scripts to Write Files” in Preferences
- Make sure the script file has .jsx extension
- Try restarting After Effects
Captions Overlap
Solution: The script automatically adds 1 frame gap. If still overlapping:
- Check your SRT file for timing errors
- Open the precomp and manually adjust layer timing
- Download it using link https://drive.google.com/file/d/1XkMAR6qJBTmUCLGeh-Kz5xEg9JXmRN2m/view?usp=sharing
- i will approve the access when you send the request.
SEO Keywords Covered
This tutorial covers: After Effects captions, SRT to After Effects, Punjabi subtitles, animated captions, video caption script, social media captions, YouTube subtitles, subtitle animation, After Effects automation, free caption tool, video editing tutorial, subtitle effects, caption creator, automatic subtitles.
Conclusion
The Punjabi Caption Creator script is a game-changer for video editors working with subtitle files. In just a few clicks, you can transform plain SRT files into stunning, animated captions that boost engagement and accessibility.
Quick Recap:
- ✅ Install the script in After Effects
- ✅ Prepare your SRT file
- ✅ Run the script and configure settings
- ✅ Generate professional captions instantly
- ✅ Customize and export your video
Ready to create stunning captions? Download the script and start making your videos more engaging today!
FAQ
Q: Does this work with other languages besides Punjabi? A: Yes! This script works with any language supported by After Effects, including English, Hindi, Urdu, and more.
Q: Can I use this for commercial projects? A: Absolutely! This script is free to use for both personal and commercial projects.
Q: What version of After Effects do I need? A: The script works with After Effects CC 2017 and later versions.
Q: Can I change the animation after creating captions? A: Yes, you can modify animations by opening the precomp and adjusting keyframes manually.
Q: How many captions can this handle? A: The script can handle hundreds of captions. Processing time increases with more captions but typically stays under 1 minute.
Have questions or suggestions? Leave a comment below! Don’t forget to share this tutorial if it helped you create amazing captions.
Tags: #AfterEffects #VideoEditing #Captions #Subtitles #PunjabiContent #SocialMediaMarketing #YouTubeTips #ContentCreation
Leave a Reply