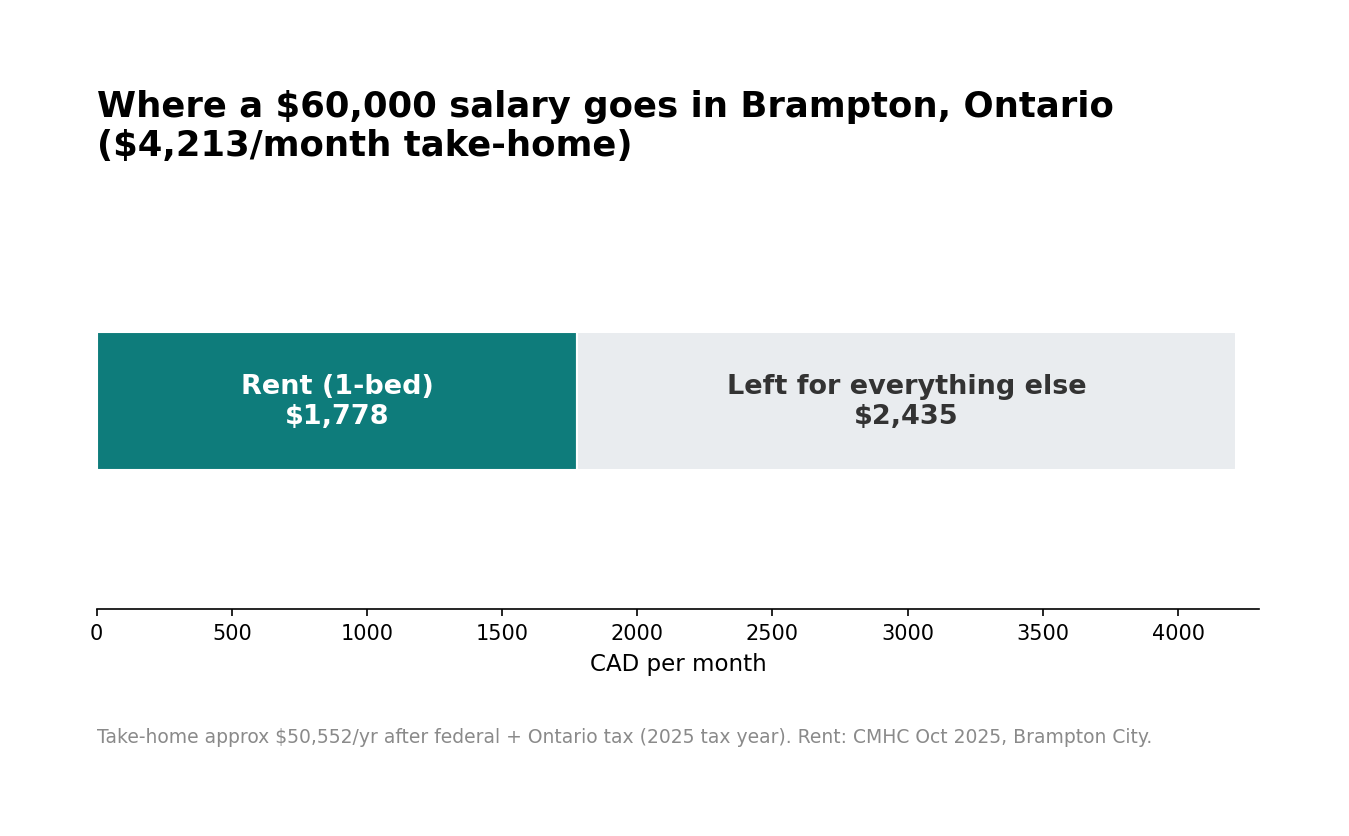
Yes — $60,000 is enough to live in Brampton, but housing will take a big bite. An average 1-bedroom rents for $1,778 a month, which is about 42% of your take-home pay. That leaves roughly $2,435 a month for everything else: food, transport, bills, and savings. It’s workable for a single person, tight for a family.
What $60,000 leaves you after tax in Ontario
Gross: $60,000/year
Estimated take-home: ~$50,552/year (~$4,213/month) after federal and Ontario income tax (2025 tax year)
Note: estimate for a single filer with no dependents; actual take-home varies with RRSP contributions, benefits, and credits.
Rent in Brampton right now
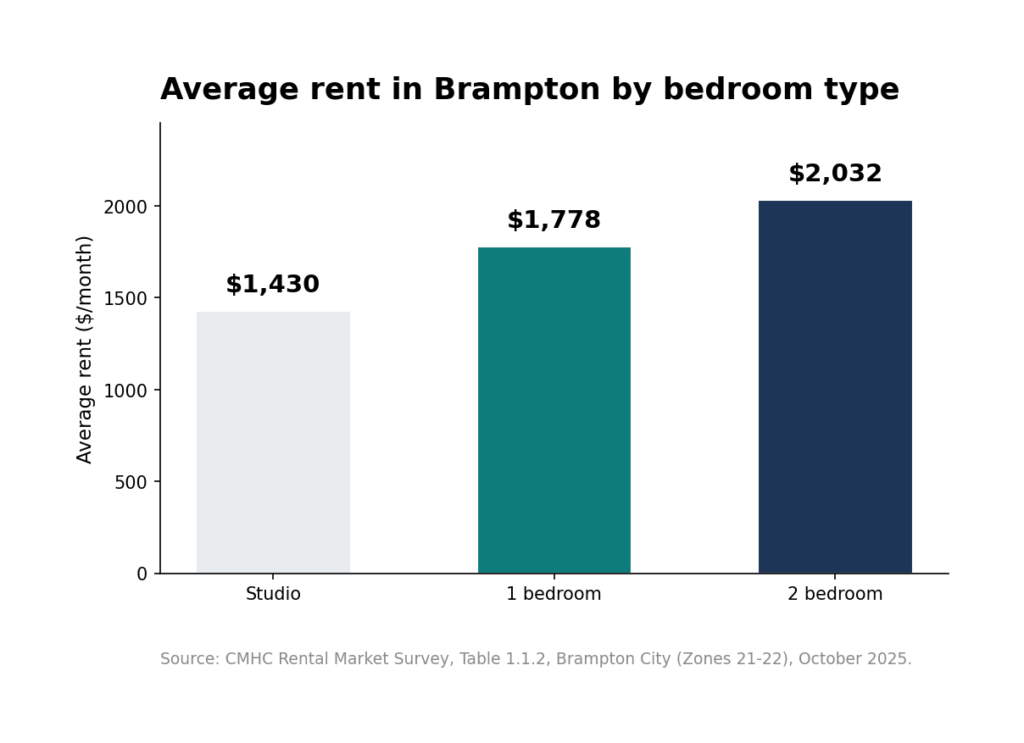
Average asking rents in Brampton (CMHC, October 2025):
Studio: $1,430/month
1 bedroom: $1,778/month
2 bedroom: $2,032/month
Brampton rents run noticeably below Toronto proper, which is the main reason the city works on a $60,000 salary. A 2-bedroom at $2,032 would take 48% of take-home — doable, but it leaves little breathing room.
What people actually earn around here
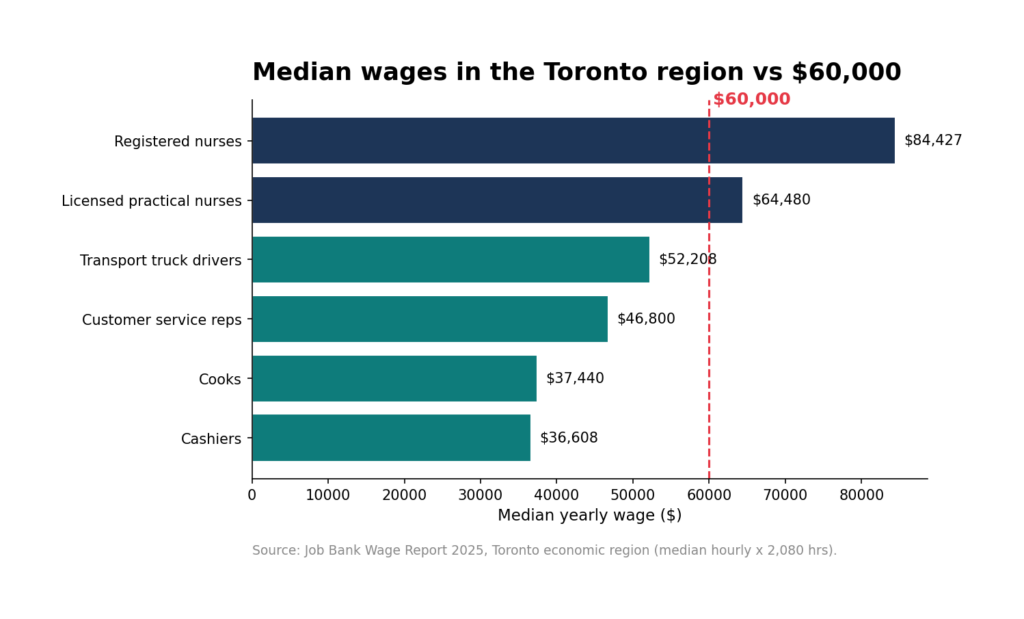
Median wages in the Toronto economic region (Job Bank, 2025 release), converted to yearly:
Cashiers: ~$36,608/year
Cooks: ~$37,440/year
Customer service representatives: ~$46,800/year
Transport truck drivers: ~$52,208/year
Licensed practical nurses: ~$64,480/year
Registered nurses: ~$84,427/year
At $60,000 you’re earning above the median for service, retail, and driving jobs in the region — roughly in line with skilled trades and practical nursing.
The monthly math
$/month
Take-home pay
$4,213
Average 1-bed rent
$1,778
Remaining for everything else
$2,435
Financial advisors often suggest keeping housing under 30–35% of gross income. At 42% of take-home on a 1-bedroom, you’re above that guideline — the classic Brampton trade-off: cheaper than Toronto, but still a stretch on a single $60k income. A studio at $1,430 (34% of take-home) fits the guideline comfortably.
What changed since last month
This is the first edition of this guide (October 2026 baseline). CMHC and Job Bank release annually, so these figures hold until the next releases — expected fall/winter 2026. We’ll update the comparison here when new data lands.
Where our data comes from
We publish our sources so you can check our math:
Wages — Job Bank Wage Report, Employment and Social Development Canada (Open Government Licence – Canada). Figures are prevailing median wages by economic region, updated annually.
Rents — CMHC Rental Market Survey, Canada Mortgage and Housing Corporation. Average rents by survey zone and bedroom type, published each December.
AMD has unveiled the next version of its Ryzen AI Halo Developer Platform, a compact desktop built for running serious AI workloads locally. Powered by the new Ryzen AI Max+ PRO 495 processor and packing up to 192GB of unified memory, it is designed to run 300-billion-parameter language models entirely on your desk — no cloud required. Here is everything we know.
What Is the Ryzen AI Halo Developer Platform?
The Ryzen AI Halo is not a traditional desktop PC. It is a compact developer workstation — roughly the size of a small mini-PC — purpose-built for building, testing, and running AI models locally. The first version arrived earlier this year with the Ryzen AI Max+ 395 chip, 128GB of memory, and a $3,999 price tag, rated for models up to 200 billion parameters.
The new version takes a big step up: the Ryzen AI Max+ PRO 495 chip, up to 192GB of LPDDR5x unified memory, and support for 300-billion-parameter models and larger at 4-bit quantization. It is aimed squarely at AI developers, researchers, and creators who want datacenter-class local AI without renting cloud GPUs.
Ryzen AI Max+ PRO 495: Full Specifications
The heart of the platform is the Ryzen AI Max+ PRO 495, which combines three processors on a single chip sharing one memory pool:
CPU: Up to 16 Zen 5 cores (32 threads), boosting up to 5.2GHz from a 3.1GHz base
Memory: Up to 192GB LPDDR5x unified memory (up to 160GB allocatable as VRAM)
Storage: 2TB SSD
Wireless: Wi-Fi 7, Bluetooth 5.4
FP16 AI compute: Up to 61 TFLOPS
AMD notes that the 55 TOPS NPU figure is a peak rating under optimal conditions, and real-world throughput varies with system configuration, model, and software version.
192GB of Unified Memory: Why It Matters for Local AI
The headline feature is the memory. In a normal PC, system RAM and graphics memory are separate pools, and large AI models have to squeeze into whichever is smaller. The Ryzen AI Max+ PRO 495 puts the CPU, GPU, and NPU on a single high-bandwidth memory pool — up to 192GB of it, with as much as 160GB assignable to the GPU as VRAM.
That changes what fits on a desk. AMD says the platform can hold 300-billion-parameter language models at 4-bit quantization entirely in memory, alongside datasets, applications, and working context. Developers can also run multiple large AI agents concurrently, each with its own KV cache — something that simply does not fit on systems with smaller GPU memory.
Built for AI Agents, Not Just Chatbots
AMD is positioning the platform around the shift from chatbots to AI agents — software that reads files, calls tools, coordinates parallel processes, and produces finished deliverables like decks, memos, and charts. In that setup, each part of the chip has a job: the CPU orchestrates the agent’s tools and processes, the GPU and NPU accelerate model inference and content generation, and the unified memory keeps models and working data loaded for all three.
AMD argues that raw tokens-per-second still matters, but for agent workloads, orchestration, memory capacity, and end-to-end task completion matter just as much.
Generative AI Performance: AMD’s Claims vs Intel and Apple
AMD tested the PRO 495 on native x86 Windows with ROCm software across 18 image, video, music, and 3D generation workloads — including FLUX.2, Qwen Image, Ideogram V4, and Stable Music — and published comparisons against two rivals:
Vs Intel Core Ultra X9 388H: Higher relative throughput across all 18 workloads, with a top result of 32.2x.
Vs Apple M5 Pro: Higher throughput across the workloads, with a top result of 34.3x. AMD notes several workloads did not run on the Apple system at all.
Two caveats worth knowing: these are AMD’s own tests from September 2026, not independent reviews, and the comparison systems carried 64GB of memory against the Halo’s 192GB — a gap that decides which workloads can even run on each machine.
Software: Ryzen AI Developer Center and AI Playbooks
Hardware is only half the story. AMD bundles a software layer meant to take developers from first boot to a running model with minimal setup:
Ryzen AI Developer Center: A single app for software, platform controls, features, and updates, with remote access and software sync.
Preloaded apps and models: Installed out of the box so testing can start immediately.
AI Playbooks: Guided paths through supported AI workflows.
Best-Known Configuration: AMD validates ROCm software, drivers, frameworks, applications, and models together as one set, restorable through the Developer Center.
Windows-based versions will ship with Microsoft’s Windows Project Zenith, a ready-to-code Windows experience with VS Code, WSL, GitHub Copilot CLI, and PowerShell preinstalled.
Price and Availability
The Ryzen AI Halo Developer Platform with the Ryzen AI Max+ PRO 495 is available to order now from Micro Center in the US at $7,299.99 — $3,300 more than the first-generation 128GB model. Note that Micro Center lists it as in-store pickup only, with no shipping. Windows Project Zenith versions are coming soon. AMD has not announced pricing for other regions.
Ryzen AI Halo vs NVIDIA RTX Spark: The Local AI PC Race
The timing is no coincidence. NVIDIA just opened pre-orders for its RTX Spark AI PCs — laptops and compact desktops with up to 128GB of unified memory starting at $2,599. AMD’s answer is a more expensive, more memory-heavy developer box: 192GB vs 128GB, $7,299 vs $2,599.
The two target different buyers. RTX Spark is a consumer-and-creator platform that also plays AAA games; the Ryzen AI Halo is a developer-first machine for people whose models genuinely need 160GB of VRAM. But together they mark the same turning point: 2026 is the year serious AI moved from the cloud to the desk.
Should You Buy It?
The Ryzen AI Halo makes sense for a narrow audience: AI developers and researchers running very large local models or multi-agent workflows who would otherwise pay for cloud GPU time. For everyone else — including most creators — the $7,299 price and developer focus make it a tough sell against cheaper local-AI options.
Still, as a statement of where the industry is going, it matters. Unified memory architectures are rapidly becoming the default for local AI, and AMD just raised the bar for how much of it you can get in a box that sits quietly on a desk.
NVIDIA and Microsoft have officially kicked off a new era of AI computing. Their joint platform, NVIDIA RTX Spark, puts datacenter-class AI power into laptops and compact desktops — and the first machines hit store shelves on October 16, 2026. Preorders opened October 7, with six PC makers shipping RTX Spark hardware at launch, a scale no AI-focused chip launch has reached before.
But what exactly is RTX Spark, and should you care? Here’s everything we know so far.
What Is NVIDIA RTX Spark?
RTX Spark is a new chip platform co-developed by NVIDIA and Microsoft, built around one idea: running powerful AI models locally on your PC instead of sending every request to a cloud datacenter.
NVIDIA calls it a two-part platform. RTX Spark itself is the hardware half — a CPU-plus-GPU “superchip.” Microsoft provides the software half, called Microsoft Execution Containers (MXC), which is baked into Windows 11 and manages how AI workloads run on the machine.
The pitch is simple: chatbots, coding assistants, image generators, and autonomous AI agents running entirely on your laptop — no subscription, no latency, no data leaving your device.
RTX Spark Specs: What’s Inside the Superchip
The numbers NVIDIA has shared are serious:
GPU: Blackwell-generation RTX graphics with up to 6,144 CUDA cores
CPU: 20-core NVIDIA Grace processor based on the Arm architecture (a mix of Cortex-X925 and Cortex-A725 cores)
Interconnect: NVLink-C2C chip-to-chip link instead of a conventional PCIe connection
Memory: up to 128GB of unified memory shared between the CPU and GPU
AI acceleration: fifth-generation Tensor Cores with FP4 precision support
Claimed performance: up to 1 petaflop of AI compute
The standout spec is the unified memory. In a normal PC, the CPU and GPU have separate memory pools, and large AI models get split awkwardly between them. RTX Spark’s shared 128GB pool means a big language model can sit in one place, accessible to both processors at full speed.
Microsoft’s Half: Execution Containers
Hardware is only half the story. Microsoft Execution Containers (MXC) is the software layer in Windows 11 that schedules and sandboxes AI workloads on RTX Spark machines.
Think of it as the traffic controller: it decides which parts of an AI task run on the GPU’s Tensor Cores, which run on the CPU, and how memory gets allocated — all without the user thinking about it. For developers, it means AI apps can target one consistent platform instead of wrestling with drivers and frameworks per machine.
Which RTX Spark PCs Can You Buy?
Six PC makers are shipping RTX Spark systems at launch. The two with the most detail so far:
Dell XPS 16 Creator Edition — Dell’s flagship creator laptop, rebuilt around a 20-core NVIDIA N1X processor (the top of the RTX Spark stack). It pairs the chip with a 3.2K OLED display running at 120Hz and a 99Wh battery. Preorders are open now at a starting price of $3,799.99, with shipments beginning October 16, 2026. Notably, this is the first Dell XPS ever built on NVIDIA silicon instead of Intel or AMD.
HP RTX Spark AI PCs — HP unveiled its RTX Spark lineup alongside the ZGX Fury GB300 workstation, with Perplexity AI integration built in. Pricing and exact configurations are still rolling out.
Expect the remaining makers to announce their models through the launch window.
Battery Life: The Big Claim
NVIDIA makes one more bold promise: RTX Spark laptops are designed to hold full AI and graphics performance while unplugged, with all-day battery life.
If true, that fixes one of the oldest complaints about powerful laptops — that they throttle hard the moment you leave the charger. But it’s worth noting this claim has not yet been independently benchmarked by reviewers. Take it as a target, not a guarantee, until third-party tests land.
Who Is RTX Spark Actually For?
Let’s be honest: most people don’t need a petaflop on their lap. RTX Spark makes the most sense for:
Developers building and testing AI agents and apps locally
Creators running image and video generation models without cloud fees
Researchers and students working with large open models
Privacy-conscious users who want AI that never phones home
If your heaviest workload is a browser with forty tabs, a conventional ultrabook remains the smarter buy — and far cheaper.
RTX Spark Price and Release Date
Preorders opened: October 7, 2026
Retail availability: October 16, 2026
Dell XPS 16 Creator Edition: from $3,799.99
HP models: pricing to be confirmed
Form factors: laptops and compact desktops, all running Windows 11
Should You Wait for RTX Spark?
If you run AI workloads daily and you’re shopping for a new machine this fall, RTX Spark is worth a serious look — it’s the first platform genuinely designed around local AI rather than bolting an NPU onto a standard laptop. If you don’t, there’s no reason to pay the early-adopter premium; prices will only come down as more makers join in.
Either way, October 16 is the date to watch. That’s when the first independent benchmarks should start appearing — and benchmarks, not launch slides, will tell us whether RTX Spark delivers on its petaflop promise.
Free Asset Downloader: A Single-File Tool for Grabbing Images, Music & SFX
ToolsWeb DevContent Creation
I Built a Free Asset Downloader for Images, Music & SFX (No Sign-ups Needed)
A single self-contained HTML page that searches multiple free stock-asset APIs at once, lets you preview results, and batch-downloads whatever you pick — all client-side, no backend, no account required.
Why I Made This
Every time I needed a quick background photo, a bit of royalty-free music, or a UI sound effect for a project, I found myself bouncing between five different websites, creating accounts, and copy-pasting URLs. So I put together a small tool that does the searching for me: one search box, multiple free sources queried in parallel, and instant previews before you commit to downloading anything.
What It Does
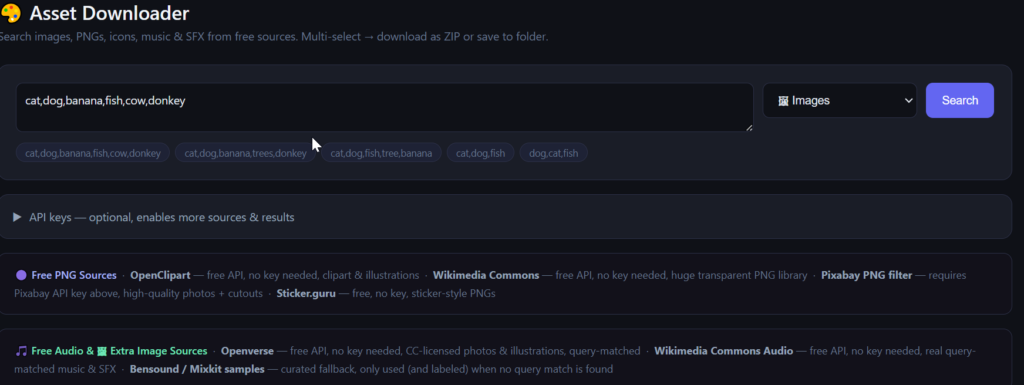
Multi-source search — searches several free, largely keyless APIs at once and merges the results into one grid.
Comma-separated queries — type dog, cat, fish and it runs each term as its own search, so you get a batch of unrelated assets in one go.
Live previews — play audio clips right in the results list before downloading, and see image thumbnails up front.
One-click and batch download — grab a single asset or select a pile of them and download everything at once.
Runs entirely in the browser — it’s one HTML file. No server, no build step, no install.
Sources It Pulls From
Type
Source
API key needed?
Images
Openverse (CC-licensed photos & illustrations)
No
Images
Pixabay / Pexels
Optional, for higher volume
Music
Wikimedia Commons Audio
No
SFX
Wikimedia Commons Audio
No
Audio (fallback)
Bensound / Mixkit curated samples
No
Audio (optional)
Freesound
Optional
Note on matching: some sources (like Bensound/Mixkit) are small curated packs rather than real search engines, so they only appear as a labeled fallback when a query doesn’t match anything from the real search APIs — that way you always know whether a result actually matches what you searched for.
How to Use It
Open the HTML file in any browser — no installation needed.
Pick a type: image, music, or SFX.
Type one search term, or several separated by commas.
Preview results, then download individually or in bulk.
The Code
It’s a single self-contained HTML file — just save it as asset_downloader.html and open it in your browser. No dependencies, no build tools.
<!DOCTYPE html>
<html lang="en">
<head>
<meta charset="UTF-8">
<meta name="viewport" content="width=device-width, initial-scale=1.0">
<title>Asset Downloader</title>
<script src="https://cdnjs.cloudflare.com/ajax/libs/jszip/3.10.1/jszip.min.js"></script>
<style>
*{box-sizing:border-box;margin:0;padding:0}
body{font-family:system-ui,sans-serif;background:#0f1117;color:#e2e8f0;min-height:100vh}
.app{max-width:1200px;margin:0 auto;padding:24px}
h1{font-size:22px;font-weight:600;margin-bottom:4px;color:#f1f5f9}
.subtitle{font-size:13px;color:#64748b;margin-bottom:24px}
.search-panel{background:#1a1d27;border:1px solid #2d3148;border-radius:12px;padding:20px;margin-bottom:16px}
.row{display:flex;gap:10px;margin-bottom:12px;flex-wrap:wrap;align-items:flex-start}
.row:last-child{margin-bottom:0}
textarea{flex:1;min-width:200px;background:#0f1117;border:1px solid #2d3148;border-radius:8px;color:#e2e8f0;padding:10px;font-size:13px;resize:vertical;min-height:52px;font-family:inherit}
textarea::placeholder{color:#475569}
textarea:focus{outline:none;border-color:#6366f1}
select{background:#0f1117;border:1px solid #2d3148;border-radius:8px;color:#e2e8f0;padding:9px 12px;font-size:13px;cursor:pointer;height:40px}
select:focus{outline:none;border-color:#6366f1}
button{border-radius:8px;padding:9px 18px;font-size:13px;font-weight:500;cursor:pointer;border:none;transition:all .15s}
.btn-primary{background:#6366f1;color:#fff;height:40px}
.btn-primary:hover{background:#5457d4}
.btn-primary:disabled{background:#2d3148;color:#475569;cursor:not-allowed}
.btn-ghost{background:transparent;color:#94a3b8;border:1px solid #2d3148}
.btn-ghost:hover{background:#1e2235;color:#e2e8f0}
.btn-success{background:#065f46;color:#6ee7b7}
.btn-success:hover{background:#047857}
.api-section{background:#1a1d27;border:1px solid #2d3148;border-radius:12px;padding:16px;margin-bottom:16px}
.api-toggle{display:flex;align-items:center;gap:8px;cursor:pointer;font-size:13px;color:#94a3b8;user-select:none}
.api-toggle:hover{color:#e2e8f0}
.api-grid{display:grid;grid-template-columns:repeat(auto-fit,minmax(240px,1fr));gap:12px;margin-top:14px}
.api-field label{font-size:11px;color:#64748b;display:block;margin-bottom:4px;text-transform:uppercase;letter-spacing:.5px}
.api-field input{width:100%;background:#0f1117;border:1px solid #2d3148;border-radius:6px;color:#e2e8f0;padding:8px 10px;font-size:12px;font-family:monospace}
.api-field input:focus{outline:none;border-color:#6366f1}
.api-field input::placeholder{color:#334155}
.status-bar{background:#1a1d27;border:1px solid #2d3148;border-radius:8px;padding:10px 14px;margin-bottom:14px;font-size:12px;color:#94a3b8;display:flex;align-items:center;gap:8px}
.dot{width:8px;height:8px;border-radius:50%;background:#334155;flex-shrink:0}
.dot.loading{background:#f59e0b;animation:pulse 1s infinite}
.dot.done{background:#10b981}
.dot.error{background:#ef4444}
.results-header{display:flex;align-items:center;justify-content:space-between;margin-bottom:12px;flex-wrap:wrap;gap:8px}
.results-header h2{font-size:15px;font-weight:500;color:#94a3b8}
.selection-actions{display:flex;gap:8px;align-items:center}
.count-badge{background:#1e2235;border:1px solid #2d3148;border-radius:6px;padding:3px 10px;font-size:12px;color:#94a3b8}
.results-grid{display:grid;grid-template-columns:repeat(auto-fill,minmax(200px,1fr));gap:14px;margin-bottom:100px}
.card{background:#1a1d27;border:1px solid #2d3148;border-radius:10px;overflow:hidden;cursor:pointer;transition:border-color .15s,transform .1s;position:relative;display:flex;flex-direction:column}
.card:hover{border-color:#6366f1;transform:translateY(-1px)}
.card.selected{border-color:#6366f1;background:#1b1c36}
.card-check{position:absolute;top:8px;right:8px;width:22px;height:22px;background:#6366f1;border-radius:5px;display:none;align-items:center;justify-content:center;font-size:13px;color:#fff;font-weight:700;z-index:5;pointer-events:none}
.card.selected .card-check{display:flex}
.img-wrap{width:100%;height:130px;background:#12111a;overflow:hidden;position:relative;flex-shrink:0}
.img-wrap img{width:100%;height:100%;object-fit:cover;display:block;opacity:0;transition:opacity .4s}
.img-wrap img.loaded{opacity:1}
.img-placeholder{position:absolute;inset:0;display:flex;align-items:center;justify-content:center;font-size:30px;color:#2d3148}
/* PNG preview: checkerboard bg to show transparency */
.png-wrap{width:100%;height:130px;background:
repeating-conic-gradient(#1e1e2e 0% 25%,#2a2a3e 0% 50%)
0 0/20px 20px;display:flex;align-items:center;justify-content:center;overflow:hidden;position:relative;flex-shrink:0}
.png-wrap img{max-width:90%;max-height:110px;object-fit:contain;opacity:0;transition:opacity .3s}
.png-wrap img.loaded{opacity:1}
.icon-wrap{width:100%;height:130px;background:#12111a;display:flex;align-items:center;justify-content:center;flex-shrink:0}
.icon-wrap img{width:72px;height:72px;object-fit:contain;opacity:0;transition:opacity .3s}
.icon-wrap img.loaded{opacity:1}
.audio-wrap{width:100%;height:130px;background:#12111a;display:flex;flex-direction:column;align-items:center;justify-content:center;gap:10px;flex-shrink:0}
.play-btn{width:52px;height:52px;border-radius:50%;background:#6366f1;border:none;cursor:pointer;display:flex;align-items:center;justify-content:center;transition:background .15s,transform .1s}
.play-btn:hover{background:#5457d4;transform:scale(1.06)}
.play-btn:active{transform:scale(.95)}
.play-icon{width:22px;height:22px;fill:#fff;margin-left:3px}
.pause-icon{width:22px;height:22px;fill:#fff}
.audio-dur{font-size:11px;color:#475569}
.prog-bar{width:80%;height:4px;background:#2d3148;border-radius:2px;cursor:pointer;overflow:hidden}
.prog-inner{height:100%;background:#6366f1;width:0%;pointer-events:none;transition:width .15s linear}
.card-info{padding:10px;flex:1}
.card-title{font-size:12px;font-weight:500;color:#e2e8f0;margin-bottom:2px;white-space:nowrap;overflow:hidden;text-overflow:ellipsis}
.card-meta{font-size:11px;color:#475569}
.card-source{display:inline-block;font-size:10px;background:#1e2235;border:1px solid #2d3148;border-radius:4px;padding:1px 6px;color:#64748b;margin-top:4px}
/* PNG source badge – distinct purple tint */
.card-source.png{background:#1e1b36;border-color:#4338a0;color:#a5b4fc}
.tag-pills{display:flex;flex-wrap:wrap;gap:6px;margin-top:8px}
.pill{font-size:11px;padding:3px 10px;border-radius:20px;background:#1e2235;border:1px solid #2d3148;color:#64748b;cursor:pointer}
.pill:hover{border-color:#6366f1;color:#a5b4fc}
.error-msg{background:#1a0a0a;border:1px solid #7f1d1d;border-radius:8px;padding:10px 14px;font-size:12px;color:#fca5a5;margin-bottom:12px}
.dl-bar{position:fixed;bottom:0;left:0;right:0;background:#0f1117;border-top:1px solid #2d3148;padding:14px 24px;display:flex;gap:10px;align-items:center;justify-content:flex-end;z-index:100}
.dl-bar.hidden{display:none}
.empty{text-align:center;padding:60px 20px;color:#475569;grid-column:1/-1}
@keyframes pulse{0%,100%{opacity:1}50%{opacity:.4}}
</style>
</head>
<body>
<div class="app">
<h1>🎨 Asset Downloader</h1>
<p class="subtitle">Search images, PNGs, icons, music & SFX from free sources. Multi-select → download as ZIP or save to folder.</p>
<div class="search-panel">
<div class="row">
<textarea id="searchInput" placeholder='Comma-separated: fire, water, tech Or JSON: [{"query":"fire","type":"sfx"},{"query":"arrow","type":"png"}]' rows="2"></textarea>
<select id="typeFilter">
<option value="all">All types</option>
<option value="image">🖼 Images</option>
<option value="png">🟣 PNG (transparent)</option>
<option value="icon">🔷 Icons</option>
<option value="music">🎵 Music</option>
<option value="sfx">🔊 SFX</option>
</select>
<button class="btn-primary" onclick="runSearch()" id="searchBtn">Search</button>
</div>
<div class="tag-pills" id="recentTags"></div>
</div>
<div class="api-section">
<div class="api-toggle" onclick="toggleApi()">
<span id="apiArrow">▶</span>
<span>API keys — optional, enables more sources & results</span>
</div>
<div id="apiPanel" style="display:none">
<div class="api-grid">
<div class="api-field"><label>Unsplash Access Key</label><input type="password" id="keyUnsplash" placeholder="paste key..."></div>
<div class="api-field"><label>Pexels API Key</label><input type="password" id="keyPexels" placeholder="paste key..."></div>
<div class="api-field"><label>Pixabay API Key</label><input type="password" id="keyPixabay" placeholder="paste key... (also used for PNGs)"></div>
<div class="api-field"><label>Freesound API Key</label><input type="password" id="keyFreesound" placeholder="paste key..."></div>
</div>
<p style="font-size:11px;color:#475569;margin-top:10px">Keys stored in localStorage only. Never sent to any server. App always falls back to no-key sources.</p>
</div>
</div>
<!-- PNG Sources info box -->
<div style="background:#12111a;border:1px solid #2d3148;border-radius:10px;padding:14px 18px;margin-bottom:16px;font-size:12px;color:#64748b;line-height:1.7">
<span style="color:#a5b4fc;font-weight:600">🟣 Free PNG Sources</span> ·
<strong style="color:#94a3b8">OpenClipart</strong> — free API, no key needed, clipart & illustrations ·
<strong style="color:#94a3b8">Wikimedia Commons</strong> — free API, no key needed, huge transparent PNG library ·
<strong style="color:#94a3b8">Pixabay PNG filter</strong> — requires Pixabay API key above, high-quality photos + cutouts ·
<strong style="color:#94a3b8">Sticker.guru</strong> — free, no key, sticker-style PNGs
</div>
<div style="background:#12111a;border:1px solid #2d3148;border-radius:10px;padding:14px 18px;margin-bottom:16px;font-size:12px;color:#64748b;line-height:1.7">
<span style="color:#6ee7b7;font-weight:600">🎵 Free Audio & 🖼 Extra Image Sources</span> ·
<strong style="color:#94a3b8">Openverse</strong> — free API, no key needed, CC-licensed photos & illustrations, query-matched ·
<strong style="color:#94a3b8">Wikimedia Commons Audio</strong> — free API, no key needed, real query-matched music & SFX ·
<strong style="color:#94a3b8">Bensound / Mixkit samples</strong> — curated fallback, only used (and labeled) when no query match is found
</div>
<div id="statusBar" class="status-bar" style="display:none">
<div class="dot" id="statusDot"></div>
<span id="statusText">Searching...</span>
</div>
<div id="errorMsg" class="error-msg" style="display:none"></div>
<div id="resultsSection" style="display:none">
<div class="results-header">
<h2 id="resultsCount">0 results</h2>
<div class="selection-actions">
<span class="count-badge" id="selectedCount">0 selected</span>
<button class="btn-ghost" style="padding:5px 12px;font-size:12px" onclick="selectAll()">Select all</button>
<button class="btn-ghost" style="padding:5px 12px;font-size:12px" onclick="clearSel()">Clear</button>
</div>
</div>
<div class="results-grid" id="resultsGrid"></div>
</div>
<div class="dl-bar hidden" id="dlBar">
<span style="font-size:13px;color:#94a3b8" id="dlCount">0 selected</span>
<button class="btn-success" onclick="downloadZip()">⬇ Download ZIP</button>
<button class="btn-ghost" onclick="saveToFolder()">📁 Save to Folder</button>
</div>
</div>
<script>
let results=[], selected=new Set(), activeAudio=null, activePlayBtn=null, activeIdx=-1;
let recent=JSON.parse(localStorage.getItem('adl_recent')||'[]');
function gk(k){return localStorage.getItem('adl_'+k)||document.getElementById(k)?.value?.trim()||''}
function saveKeys(){['keyUnsplash','keyPexels','keyPixabay','keyFreesound'].forEach(k=>{const v=document.getElementById(k).value.trim();if(v)localStorage.setItem('adl_'+k,v)})}
function loadKeys(){['keyUnsplash','keyPexels','keyPixabay','keyFreesound'].forEach(k=>{const v=localStorage.getItem('adl_'+k);if(v)document.getElementById(k).value=v})}
let apiOpen=false;
function toggleApi(){
apiOpen=!apiOpen;
document.getElementById('apiPanel').style.display=apiOpen?'block':'none';
document.getElementById('apiArrow').textContent=apiOpen?'▼':'▶';
}
function parseInput(raw){
raw=raw.trim();
if(raw.startsWith('[')){try{return JSON.parse(raw)}catch(e){}}
const t=document.getElementById('typeFilter').value;
return raw.split(',').map(q=>q.trim()).filter(Boolean).map(q=>({query:q,type:t}));
}
function setStatus(state,msg){
document.getElementById('statusBar').style.display='flex';
document.getElementById('statusText').textContent=msg;
document.getElementById('statusDot').className='dot '+(state==='loading'?'loading':state==='done'?'done':'error');
}
function showErr(m){const e=document.getElementById('errorMsg');e.style.display='block';e.textContent=m}
function hideErr(){document.getElementById('errorMsg').style.display='none'}
async function runSearch(){
const raw=document.getElementById('searchInput').value;
if(!raw.trim()){showErr('Enter search terms.');return}
saveKeys();hideErr();stopAudio();
results=[];selected=new Set();
document.getElementById('resultsSection').style.display='none';
document.getElementById('dlBar').classList.add('hidden');
setStatus('loading','Searching...');
document.getElementById('searchBtn').disabled=true;
addRecent(raw);
const queries=parseInput(raw);
let all=[];
for(const q of queries){
const types=(!q.type||q.type==='all')?['image','png','icon','music','sfx']:[q.type];
for(const t of types){
try{const r=await fetchType(q.query,t);all=all.concat(r)}catch(e){console.warn(t,e)}
}
}
results=all;
renderResults();
document.getElementById('searchBtn').disabled=false;
setStatus('done',results.length+' assets found');
}
async function fetchType(q,type){
let items=[];
if(type==='image') items=await fetchImages(q);
else if(type==='png') items=await fetchPNGs(q);
else if(type==='icon') items=await fetchIcons(q);
else if(type==='music'||type==='sfx') items=await fetchAudio(q,type);
/* Rename every file to just the search query + counter.
e.g. query "apple red" → apple_red.jpg, apple_red_2.jpg, apple_red_3.jpg */
const base=san(q);
items.forEach((item,i)=>{
const ext=item.ext||'jpg';
item.filename=i===0?`${base}.${ext}`:`${base}_${i+1}.${ext}`;
});
return items;
}
/* ── IMAGES ─────────────────────────── */
async function fetchImages(q){
const items=[];
/* Openverse – free, no key, huge CC-licensed photo/illustration search that
actually matches the query text. This is now the primary keyless source. */
try{
const d=await apiFetch(`https://api.openverse.org/v1/images/?q=${enc(q)}&page_size=12`);
(d.results||[]).forEach(h=>{
const ext=(h.url.split('.').pop()||'jpg').split('?')[0].slice(0,4);
items.push({id:'ov_'+h.id,title:h.title||q,thumb:h.thumbnail||h.url,downloadUrl:h.url,source:'Openverse',type:'image',ext,filename:san(h.title||q)+'_openverse_'+h.id+'.'+ext});
});
}catch(e){console.warn('Openverse',e)}
const pxk=gk('keyPixabay');
if(pxk){
try{
const d=await apiFetch(`https://pixabay.com/api/?key=${pxk}&q=${enc(q)}&image_type=photo&per_page=9&safesearch=true`);
(d.hits||[]).forEach(h=>items.push({id:'px_'+h.id,title:h.tags||q,thumb:h.previewURL,downloadUrl:h.largeImageURL,source:'Pixabay',type:'image',ext:'jpg',filename:san(q)+'_pixabay_'+h.id+'.jpg'}));
}catch(e){}
}
const usk=gk('keyUnsplash');
if(usk){
try{
const d=await apiFetch(`https://api.unsplash.com/search/photos?query=${enc(q)}&per_page=9`,{Authorization:'Client-ID '+usk});
(d.results||[]).forEach(h=>items.push({id:'us_'+h.id,title:h.alt_description||q,thumb:h.urls.small,downloadUrl:h.urls.regular,source:'Unsplash',type:'image',ext:'jpg',filename:san(q)+'_unsplash_'+h.id+'.jpg'}));
}catch(e){}
}
const pxlk=gk('keyPexels');
if(pxlk){
try{
const d=await apiFetch(`https://api.pexels.com/v1/search?query=${enc(q)}&per_page=9`,{Authorization:pxlk});
(d.photos||[]).forEach(h=>items.push({id:'pxl_'+h.id,title:h.alt||q,thumb:h.src.medium,downloadUrl:h.src.large,source:'Pexels',type:'image',ext:'jpg',filename:san(q)+'_pexels_'+h.id+'.jpg'}));
}catch(e){}
}
/* Picsum is just random placeholder photos keyed by seed number — it does
NOT search by keyword, so it never actually matches the query. Only use
it as a last-resort filler when every real search above found nothing,
and label it clearly so it's not mistaken for a real match. */
if(items.length===0){
const seed=encodeURIComponent(q);
for(let i=0;i<6;i++){
const s=seed+i;
items.push({id:'picsum_'+s,title:q+' (random placeholder, not query-matched)',thumb:`https://picsum.photos/seed/${s}/400/300`,downloadUrl:`https://picsum.photos/seed/${s}/1200/900`,source:'Picsum (random)',type:'image',ext:'jpg',filename:san(q)+'_placeholder_'+i+'.jpg'});
}
}
return items;
}
/* ── PNGs (transparent) ─────────────── */
async function fetchPNGs(q){
const items=[];
/* 1. OpenClipart – free REST API, no key, SVG+PNG clipart */
try{
const d=await apiFetch(`https://openclipart.org/search/json/?query=${enc(q)}&amount=12&offset=0`);
(d.payload||[]).forEach(clip=>{
/* thumbnail is SVG-rendered PNG via their CDN */
const thumb=clip.svg?.png_2400||clip.svg?.png_480||'';
const dlUrl=clip.svg?.png_2400||clip.svg?.url||'';
if(!thumb) return;
items.push({
id:'oc_'+clip.id,
title:clip.title||q,
thumb,
downloadUrl:dlUrl,
source:'OpenClipart',
type:'png',
ext: dlUrl.endsWith('.svg')?'svg':'png',
filename:san(clip.title||q)+'_openclipart_'+clip.id+(dlUrl.endsWith('.svg')?'.svg':'.png'),
isPng:true
});
});
}catch(e){console.warn('OpenClipart',e)}
/* 2. Wikimedia Commons – free MediaWiki API, no key */
try{
const url=`https://commons.wikimedia.org/w/api.php?action=query&generator=search&gsrnamespace=6&gsrsearch=${enc(q)}+filetype:png&gsrlimit=12&prop=imageinfo&iiprop=url|mime|size|thumburl&iiurlwidth=300&format=json&origin=*`;
const d=await apiFetch(url);
const pages=Object.values(d?.query?.pages||{});
pages.forEach(p=>{
const ii=p.imageinfo?.[0];
if(!ii||ii.mime!=='image/png') return;
items.push({
id:'wm_'+p.pageid,
title:p.title?.replace('File:','')||q,
thumb:ii.thumburl||ii.url,
downloadUrl:ii.url,
source:'Wikimedia',
type:'png',
ext:'png',
filename:san(p.title?.replace('File:','')||q)+'.png',
isPng:true
});
});
}catch(e){console.warn('Wikimedia',e)}
/* 3. Pixabay PNG filter (transparent clipart/vector) – needs key */
const pxk=gk('keyPixabay');
if(pxk){
try{
const d=await apiFetch(`https://pixabay.com/api/?key=${pxk}&q=${enc(q)}&image_type=clipart&colors=transparent&per_page=10&safesearch=true`);
(d.hits||[]).forEach(h=>{
items.push({
id:'pxpng_'+h.id,
title:h.tags||q,
thumb:h.previewURL,
downloadUrl:h.largeImageURL,
source:'Pixabay PNG',
type:'png',
ext:'png',
filename:san(q)+'_pixabay_png_'+h.id+'.png',
isPng:true
});
});
}catch(e){console.warn('Pixabay PNG',e)}
}
/* 4. Sticker.guru – free, no-key, sticker PNG CDN via search */
try{
/* They expose a simple JSON endpoint used by their site */
const d=await apiFetch(`https://sticker.guru/api/search?q=${enc(q)}&limit=8`);
(d.results||d.stickers||[]).slice(0,8).forEach((s,i)=>{
const thumb=s.thumbnail||s.url||s.image||'';
const dlUrl=s.url||s.image||thumb;
if(!thumb) return;
items.push({
id:'sg_'+i+'_'+q,
title:s.title||q+' sticker',
thumb,
downloadUrl:dlUrl,
source:'Sticker.guru',
type:'png',
ext:'png',
filename:san(s.title||q)+'_sticker_'+i+'.png',
isPng:true
});
});
}catch(e){/* sticker.guru may 404 if endpoint changes – silent */}
return items;
}
/* ── ICONS ─────────────────────────── */
async function fetchIcons(q){
const items=[];
try{
const d=await apiFetch(`https://api.iconify.design/search?query=${enc(q)}&limit=24`);
(d.icons||[]).slice(0,20).forEach(icon=>{
const [prefix,name]=icon.split(':');
const thumbUrl=`https://api.iconify.design/${prefix}/${name}.svg?color=%236366f1`;
const dlUrl=`https://api.iconify.design/${prefix}/${name}.svg`;
items.push({id:'ify_'+icon,title:name+' ('+prefix+')',thumb:thumbUrl,downloadUrl:dlUrl,source:'Iconify',type:'icon',ext:'svg',filename:san(name)+'.svg'});
});
}catch(e){}
return items;
}
/* ── AUDIO ─────────────────────────── */
async function fetchAudio(q,subtype){
const items=[];
const fsk=gk('keyFreesound');
if(fsk){
try{
const filter=subtype==='music'?'&filter=tag:music':'';
const d=await apiFetch(`https://freesound.org/apiv2/search/text/?query=${enc(q)}${filter}&fields=id,name,previews,duration&token=${fsk}&page_size=10`);
(d.results||[]).forEach(s=>{
const prev=s.previews?.['preview-lq-mp3']||'';
if(!prev)return;
items.push({id:'fs_'+s.id,title:s.name,previewUrl:prev,downloadUrl:prev,source:'Freesound',type:subtype,ext:'mp3',duration:Math.round(s.duration),filename:san(s.name)+'.mp3'});
});
}catch(e){console.warn('Freesound',e)}
}
/* Wikimedia Commons audio – free, no key, and actually matches the query
(searches ogg/mp3/wav/flac files whose title/description contains q) */
try{
const url=`https://commons.wikimedia.org/w/api.php?action=query&generator=search&gsrnamespace=6&gsrsearch=${enc(q)}+(filetype:ogg+OR+filetype:mp3+OR+filetype:wav+OR+filetype:flac)&gsrlimit=12&prop=imageinfo&iiprop=url|mime|size|duration&format=json&origin=*`;
const d=await apiFetch(url);
const pages=Object.values(d?.query?.pages||{});
pages.forEach(p=>{
const ii=p.imageinfo?.[0];
if(!ii||!/^audio\//.test(ii.mime||'')) return;
const ext=(ii.url.split('.').pop()||'mp3').toLowerCase();
const title=p.title?.replace('File:','')||q;
items.push({id:'wma_'+p.pageid,title,previewUrl:ii.url,downloadUrl:ii.url,source:'Wikimedia',type:subtype,ext,duration:ii.duration?Math.round(ii.duration):undefined,filename:san(title)+'.'+ext});
});
}catch(e){console.warn('Wikimedia audio',e)}
/* Curated sample packs (Bensound/Mixkit) only kick in as a fallback when
nothing above actually matched the query — and only if a track's own
name loosely matches the search term, so they don't get mixed into
unrelated queries. */
if(items.length===0){
const ql=q.toLowerCase();
if(subtype==='music'){
const tracks=[
{t:'Ukulele',u:'https://www.bensound.com/bensound-music/bensound-ukulele.mp3'},
{t:'Sunny',u:'https://www.bensound.com/bensound-music/bensound-sunny.mp3'},
{t:'Acoustic Breeze',u:'https://www.bensound.com/bensound-music/bensound-acousticbreeze.mp3'},
{t:'Creative Minds',u:'https://www.bensound.com/bensound-music/bensound-creativeminds.mp3'},
{t:'Epic',u:'https://www.bensound.com/bensound-music/bensound-epic.mp3'},
];
const matched=tracks.filter(t=>t.t.toLowerCase().includes(ql)||ql.includes(t.t.toLowerCase()));
const pool=matched.length?matched:tracks;
pool.forEach((t,i)=>items.push({id:'bs_'+i+'_'+san(q),title:'Bensound – '+t.t+(matched.length?'':' (sample, not query-matched)'),previewUrl:t.u,downloadUrl:t.u,source:'Bensound',type:'music',ext:'mp3',filename:'bensound_'+san(t.t)+'.mp3'}));
}
if(subtype==='sfx'){
const sfx=[
{t:'Notification Bell',u:'https://assets.mixkit.co/sfx/preview/mixkit-software-interface-start-2574.mp3'},
{t:'Button Click',u:'https://assets.mixkit.co/sfx/preview/mixkit-select-click-1109.mp3'},
{t:'Success Chime',u:'https://assets.mixkit.co/sfx/preview/mixkit-achievement-bell-600.mp3'},
{t:'Alert Tone',u:'https://assets.mixkit.co/sfx/preview/mixkit-alarm-clock-beep-988.mp3'},
{t:'Game Win',u:'https://assets.mixkit.co/sfx/preview/mixkit-winning-chimes-2015.mp3'},
{t:'Swoosh',u:'https://assets.mixkit.co/sfx/preview/mixkit-fast-small-sweep-transition-166.mp3'},
];
const matched=sfx.filter(s=>s.t.toLowerCase().includes(ql)||ql.includes(s.t.toLowerCase()));
const pool=matched.length?matched:sfx;
pool.forEach((s,i)=>items.push({id:'mx_'+i+'_'+san(q),title:'Mixkit – '+s.t+(matched.length?'':' (sample, not query-matched)'),previewUrl:s.u,downloadUrl:s.u,source:'Mixkit',type:'sfx',ext:'mp3',filename:'mixkit_'+san(s.t)+'.mp3'}));
}
}
return items;
}
async function apiFetch(url,headers={}){
const r=await fetch(url,{headers:{...headers}});
if(!r.ok) throw new Error('HTTP '+r.status);
return r.json();
}
/* ── RENDER ─────────────────────────── */
function renderResults(){
const grid=document.getElementById('resultsGrid');
grid.innerHTML='';
document.getElementById('resultsSection').style.display='block';
document.getElementById('resultsCount').textContent=results.length+' results';
if(!results.length){
grid.innerHTML='<div class="empty"><p>No results. Try different terms or add API keys for more sources.</p></div>';
return;
}
results.forEach((item,idx)=>{
const card=document.createElement('div');
card.className='card';
card.dataset.idx=idx;
let preview='';
if(item.type==='png'){
/* checkerboard bg to reveal transparency */
preview=`<div class="png-wrap">
<img src="${esc(item.thumb)}" loading="lazy" decoding="async"
onload="this.classList.add('loaded')"
onerror="this.outerHTML='<span style=\'font-size:36px\'>🖼️</span>'"
alt="${esc(item.title)}">
</div>`;
} else if(item.type==='image'){
preview=`<div class="img-wrap">
<div class="img-placeholder">🖼</div>
<img src="${esc(item.thumb)}" loading="lazy" decoding="async"
onload="this.classList.add('loaded');this.previousElementSibling.style.display='none'"
onerror="this.remove()"
alt="${esc(item.title)}">
</div>`;
} else if(item.type==='icon'){
preview=`<div class="icon-wrap">
<img src="${esc(item.thumb)}" loading="lazy" decoding="async"
onload="this.classList.add('loaded')"
onerror="this.outerHTML='<span style=\'font-size:40px;color:#6366f1\'>🔷</span>'"
alt="${esc(item.title)}" style="width:72px;height:72px">
</div>`;
} else {
const dur=item.duration?fmtDur(item.duration):'';
preview=`<div class="audio-wrap">
<button class="play-btn" onclick="togglePlay(event,${idx})" aria-label="Play preview">
<svg class="play-icon" viewBox="0 0 24 24"><polygon points="6,3 20,12 6,21" fill="white"/></svg>
<svg class="pause-icon" viewBox="0 0 24 24" style="display:none"><rect x="5" y="3" width="4" height="18" fill="white"/><rect x="15" y="3" width="4" height="18" fill="white"/></svg>
</button>
${dur?`<div class="audio-dur">${dur}</div>`:''}
<div class="prog-bar" onclick="seekAudio(event,${idx})">
<div class="prog-inner" id="prog_${idx}"></div>
</div>
</div>`;
}
const sourceCls=item.isPng?'card-source png':'card-source';
card.innerHTML=`
<div class="card-check">✓</div>
${preview}
<div class="card-info">
<div class="card-title" title="${esc(item.title)}">${esc(item.title)}</div>
<div class="card-meta" title="${esc(item.filename||'')}">${(item.ext||'').toUpperCase()}${item.isPng?' · transparent':''}<br><span style="color:#6366f1;font-size:10px;word-break:break-all">${esc((item.filename||'').slice(0,32))}${(item.filename||'').length>32?'…':''}</span></div>
<span class="${sourceCls}">${item.source}</span>
</div>`;
card.addEventListener('click',e=>{
if(e.target.closest('.play-btn')||e.target.closest('.prog-bar')) return;
toggleSel(idx,card);
});
grid.appendChild(card);
});
updateUI();
}
/* ── AUDIO PLAYBACK ─────────────────── */
function togglePlay(e,idx){
e.stopPropagation();
const item=results[idx];
if(!item?.previewUrl) return;
const btn=e.currentTarget;
if(activeIdx===idx&&activeAudio){
if(activeAudio.paused){activeAudio.play();setPlayState(btn,true)}
else{activeAudio.pause();setPlayState(btn,false)}
return;
}
stopAudio();
const audio=new Audio(item.previewUrl);
audio.preload='auto';
audio.addEventListener('timeupdate',()=>{
if(!audio.duration) return;
const bar=document.getElementById('prog_'+idx);
if(bar) bar.style.width=(audio.currentTime/audio.duration*100).toFixed(2)+'%';
});
audio.addEventListener('ended',()=>{setPlayState(btn,false);const bar=document.getElementById('prog_'+idx);if(bar)bar.style.width='0%';activeIdx=-1});
audio.addEventListener('error',()=>{setPlayState(btn,false);activeIdx=-1});
audio.play().then(()=>setPlayState(btn,true)).catch(()=>setPlayState(btn,false));
activeAudio=audio;activePlayBtn=btn;activeIdx=idx;
}
function seekAudio(e,idx){
if(!activeAudio||activeIdx!==idx) return;
const rect=e.currentTarget.getBoundingClientRect();
activeAudio.currentTime=((e.clientX-rect.left)/rect.width)*activeAudio.duration;
}
function stopAudio(){
if(activeAudio){activeAudio.pause();activeAudio.src='';activeAudio=null}
if(activePlayBtn){setPlayState(activePlayBtn,false);activePlayBtn=null}
document.querySelectorAll('.prog-inner').forEach(b=>b.style.width='0%');
activeIdx=-1;
}
function setPlayState(btn,playing){
const pi=btn.querySelector('.play-icon'),pa=btn.querySelector('.pause-icon');
if(pi)pi.style.display=playing?'none':'block';
if(pa)pa.style.display=playing?'block':'none';
}
/* ── SELECTION ──────────────────────── */
function toggleSel(idx,card){selected.has(idx)?selected.delete(idx):selected.add(idx);card.classList.toggle('selected',selected.has(idx));updateUI()}
function selectAll(){results.forEach((_,i)=>selected.add(i));rerenderSel()}
function clearSel(){selected.clear();rerenderSel()}
function rerenderSel(){document.querySelectorAll('.card').forEach(c=>c.classList.toggle('selected',selected.has(+c.dataset.idx)));updateUI()}
function updateUI(){
const n=selected.size;
document.getElementById('selectedCount').textContent=n+' selected';
document.getElementById('dlCount').textContent=n+' selected';
document.getElementById('dlBar').classList.toggle('hidden',n===0);
}
/* ── DOWNLOAD ───────────────────────── */
async function downloadZip(){
const items=[...selected].map(i=>results[i]);
if(!items.length) return;
setStatus('loading','Packaging '+items.length+' files into ZIP...');
const zip=new JSZip(),seen={};
for(const item of items){
try{
let fn=item.filename||san(item.title)+'.'+item.ext;
if(seen[fn]){seen[fn]++;fn=fn.replace(/(\.\w+)$/,'_'+seen[fn]+'$1')}else seen[fn]=1;
const r=await fetch(item.downloadUrl,{mode:'cors'});
if(!r.ok) throw new Error('HTTP '+r.status);
zip.file(fn,await r.blob());
}catch(er){console.warn('Skipped',item.title,er.message)}
}
const blob=await zip.generateAsync({type:'blob',compression:'DEFLATE'});
const a=document.createElement('a');
a.href=URL.createObjectURL(blob);
a.download='assets_'+Date.now()+'.zip';
a.click();
setStatus('done','ZIP downloaded!');
}
async function saveToFolder(){
if(!window.showDirectoryPicker){showErr('Save to Folder requires Chrome/Edge. Use ZIP download instead.');return}
const items=[...selected].map(i=>results[i]);
if(!items.length) return;
try{
const dir=await window.showDirectoryPicker({mode:'readwrite'});
setStatus('loading','Saving '+items.length+' files...');
const seen={};
for(const item of items){
try{
let fn=item.filename||san(item.title)+'.'+item.ext;
if(seen[fn]){seen[fn]++;fn=fn.replace(/(\.\w+)$/,'_'+seen[fn]+'$1')}else seen[fn]=1;
const r=await fetch(item.downloadUrl,{mode:'cors'});
if(!r.ok) throw new Error('HTTP '+r.status);
const fh=await dir.getFileHandle(fn,{create:true});
const w=await fh.createWritable();
await w.write(await r.blob());
await w.close();
}catch(er){console.warn('Skipped',item.title,er.message)}
}
setStatus('done','Files saved!');
}catch(er){if(er.name!=='AbortError')showErr('Folder save failed: '+er.message)}
}
/* ── HELPERS ────────────────────────── */
function san(s){return (s||'file').replace(/[^a-zA-Z0-9_\-]/g,'_').slice(0,40)}
function enc(s){return encodeURIComponent(s||'')}
function esc(s){return (s||'').replace(/&/g,'&').replace(/</g,'<').replace(/>/g,'>').replace(/"/g,'"')}
function fmtDur(s){const m=Math.floor(s/60);return m+':'+(s%60<10?'0':'')+Math.round(s%60)}
function addRecent(q){recent=recent.filter(r=>r!==q);recent.unshift(q);recent=recent.slice(0,8);localStorage.setItem('adl_recent',JSON.stringify(recent));renderRecent()}
function renderRecent(){
const c=document.getElementById('recentTags');c.innerHTML='';
recent.slice(0,6).forEach(q=>{const p=document.createElement('span');p.className='pill';p.textContent=q.length>30?q.slice(0,28)+'…':q;p.onclick=()=>{document.getElementById('searchInput').value=q;runSearch()};c.appendChild(p)});
}
loadKeys();renderRecent();
document.getElementById('searchInput').addEventListener('keydown',e=>{if(e.key==='Enter'&&(e.ctrlKey||e.metaKey))runSearch()});
['keyUnsplash','keyPexels','keyPixabay','keyFreesound'].forEach(k=>document.getElementById(k).addEventListener('change',saveKeys));
</script>
</body>
</html>
Copy the code above into a file named asset_downloader.html, or grab the file directly if you downloaded it from this post.
What’s Next
Planning to add a few more free, keyless sources over time, plus better duplicate detection across sources. If you have a favorite free asset API that doesn’t require sign-up, let me know in the comments.
How to Transcribe Audio for Free Using Whisper on Kaggle (No Third-Party Uploads)
If you make YouTube videos and need accurate subtitles, you don’t need to upload your audio to some random third-party website. In this tutorial, I’ll show you how I generate word-by-word, sentence-level, and karaoke-style subtitles completely for free, using a Kaggle notebook running OpenAI’s Whisper model — with everything staying under my control.
Why This Approach?
Privacy matters, especially if your audio contains anything sensitive or unfinished. Instead of sending your files to a third-party subtitle service, this method runs entirely inside your own Kaggle notebook. Your audio never leaves a platform you control.
Create a new dataset in Kaggle and upload your audio file to it. This keeps your file private and lets you swap it out later by simply bumping the dataset version.
Step 2: Run the Transcription Script
Here’s the full script. It uses stable-ts (built on top of OpenAI’s Whisper) to transcribe and align your audio, then exports three types of subtitle files.
import os
import glob
os.system('pip install -q stable-ts')
import stable_whisper

WHISPER_MODEL = 'large'
LANGUAGE      = 'en'
OUTPUT_DIR    = '/kaggle/working'

audio_files = (
    glob.glob('/kaggle/input/**/*.mp3', recursive=True) +
    glob.glob('/kaggle/input/**/*.mp4', recursive=True) +
    glob.glob('/kaggle/input/**/*.wav', recursive=True) +
    glob.glob('/kaggle/input/**/*.m4a', recursive=True)
)
if not audio_files:
    raise FileNotFoundError('No audio found in /kaggle/input')

AUDIO_FILE = audio_files[0]
print(f'Using: {AUDIO_FILE}')

import torch
device = 'cpu'
if torch.cuda.is_available():
    try:
        cap = torch.cuda.get_device_capability(0)
        if cap >= (7, 0):
            device = 'cuda'
        else:
            print(f'GPU capability {cap} too old, using CPU instead.')
    except Exception as e:
        print(f'GPU check failed ({e}), using CPU instead.')

model = stable_whisper.load_model(WHISPER_MODEL, device=device)
result = model.transcribe(AUDIO_FILE, language=LANGUAGE, word_timestamps=True, verbose=False)

base = os.path.splitext(os.path.basename(AUDIO_FILE))[0]
word_srt = os.path.join(OUTPUT_DIR, f'{base}_word_level.srt')
result.to_srt_vtt(word_srt, word_level=True, tag=('', ''))

sent_srt = os.path.join(OUTPUT_DIR, f'{base}_sentence.srt')
result.to_srt_vtt(sent_srt, word_level=False)

print('Done! Files saved to /kaggle/working')
Step 3: Pull Your Output
Once the kernel finishes running, use the Kaggle API to pull your output files directly to your computer:
Bring the exported SRT files into your video editor (CapCut, Premiere, etc.) to add synced captions to your video.
Wrap-Up
That’s it — accurate, free subtitles without ever handing your audio to a third-party website. If you found this useful, subscribe for more tutorials like this.
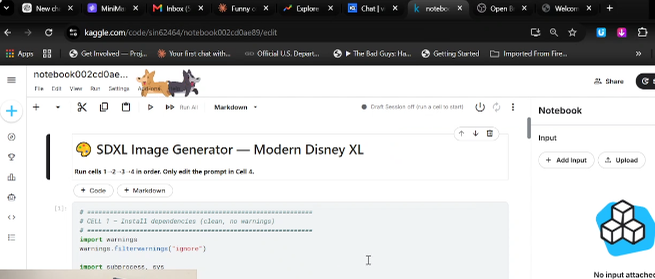
If you create cartoon content, YouTube thumbnails, kids' educational videos, or any kind of visual assets, you've probably run into the same wall: AI image generators are either expensive, rate-limited, or watermark your output. In this tutorial, I'll show you how to set up a **completely free AI image generator** using Kaggle's GPU notebooks and Stable Diffusion XL — and how to generate images in **bulk batches** with just a list of prompts.
By the end of this guide, you'll have a reusable notebook where you can drop in 10, 20, or even 50 prompts, hit run, and walk away with a folder of finished images — zipped and ready to download.
Why Kaggle for AI Image Generation?
Most free AI image generator tools online limit you to a handful of images per day, strip out resolution, or require a subscription for anything beyond basic use. Running Stable Diffusion locally is an option, but it requires a powerful GPU — something most laptops simply don’t have.
Kaggle solves this elegantly. Every Kaggle account comes with free access to NVIDIA T4 GPUs, with roughly 30 hours of GPU time per week at no cost. That’s more than enough to generate hundreds of high-quality images weekly, especially if you’re working on a content calendar that needs a steady stream of visual assets.
The setup runs entirely in your browser through a Jupyter-style notebook. No installation on your computer, no driver issues, nothing to maintain.
What You’ll Need
A free Kaggle account (sign up at kaggle.com if you don't have one)
- About 15 minutes for initial setup
- A list of prompts for whatever images you want to create
That's it. No credit card, no API keys, no subscriptions.
Create a New Notebook with GPU Enabled
Once you're logged into Kaggle, head to the Notebooks section and create a new notebook. Before doing anything else, you need to enable GPU access:
1. Open the notebook settings panel (usually on the right side)
2. Under "Accelerator," select **GPU T4 x2** (or whichever T4 option is available)
3. Save the settings
This step is critical. Without enabling the GPU, the notebook will try to run everything on CPU, which would make image generation painfully slow — we're talking minutes per image instead of seconds.
Install the Required Libraries
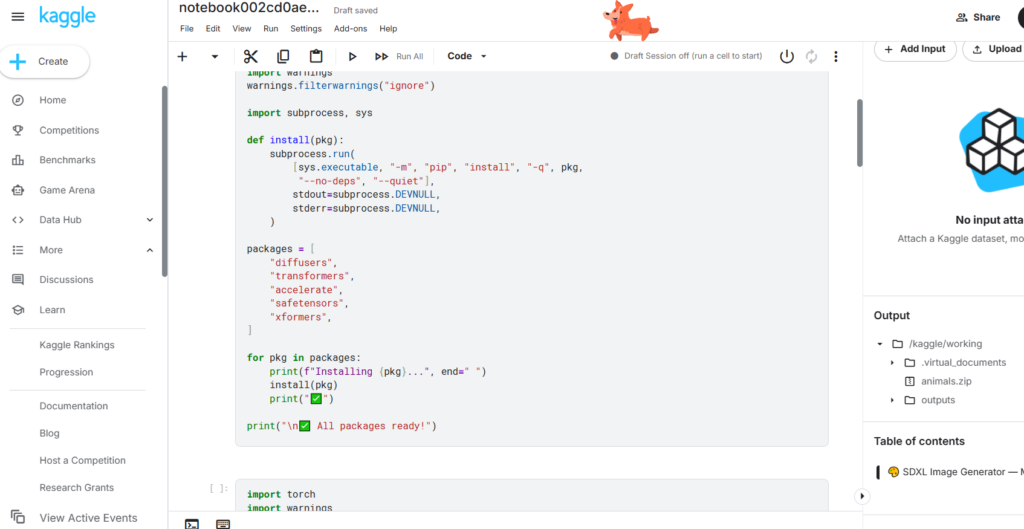
The first cell in the notebook handles installing everything needed to run Stable Diffusion. This includes the Diffusers library (which handles the actual image generation pipeline), Transformers, Accelerate for performance optimization, and a few supporting packages.
This installation step typically takes under a minute. One thing worth knowing: Kaggle notebooks come pre-loaded with a lot of data science packages, and you might see some dependency warning messages during installation. These are harmless — they're conflicts between Kaggle's pre-installed packages and the new ones, but they don't affect the image generation pipeline at all.
Load the Image Generation Model
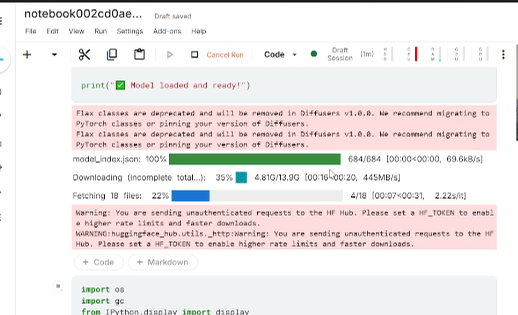
This is where the magic happens. The second cell loads the actual AI model — in this case, we're using Playground v2.5, a Stable Diffusion XL model known for producing vibrant, high-quality results that work well for both realistic and stylized/cartoon imagery.
The first time you run this cell, it will download the model files, which total a few gigabytes. This download happens once per session — if your notebook restarts, you'll need to run this cell again, but Kaggle often caches it for faster reloads.
A few optimizations are baked into this step that are worth understanding even if you're not technical:
Memory-efficient attention** allows the GPU to process images using less memory, which means you can generate larger images without running into "out of memory" errors.
VAE slicing and tiling** breaks the final image decoding step into smaller chunks. This is what allows you to run a long batch of images back-to-back without the GPU running out of room — a problem that commonly occurs when generating many images in sequence without this optimization.
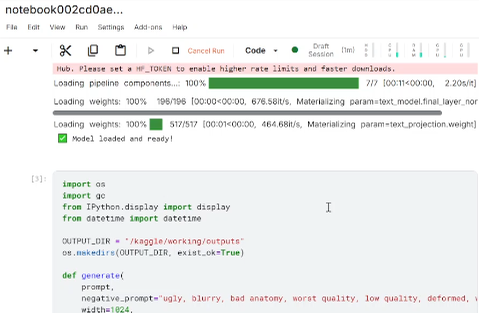
Once this cell finishes, you'll see a confirmation message that the model is loaded and ready.
Set Up the Generator Function
The third cell defines a reusable function that handles the actual image creation process. Think of this as the "engine" — you won't need to touch this cell directly, but it's what powers everything that follows
This function takes care of several things automatically
Generating the image based on your prompt
- Applying a "negative prompt" — essentially a list of things you don't want in the image, like blurry results, distorted anatomy, or watermarks
- Saving each image with a unique filename based on the time it was created
Displaying the image directly in the notebook so you can preview it immediately
Cleaning up GPU memory after each image, which prevents crashes during long batch run
You only need to run this cell once per session.
Add Your Prompts and Generate in Bulk
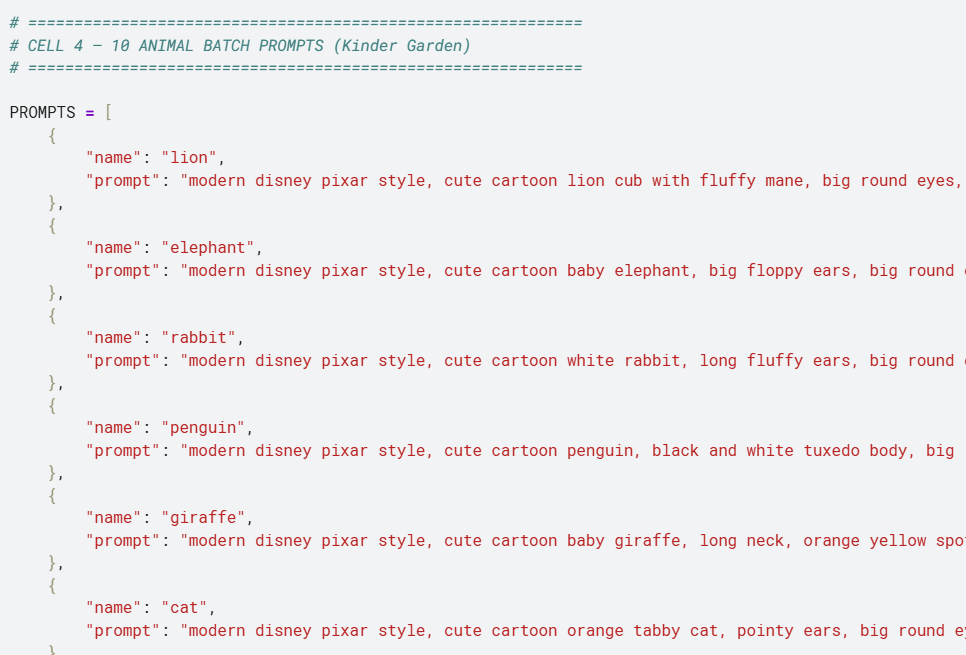
This is the cell you'll actually edit every time you want new images. It contains a simple list where each entry has two parts: a name (used for the filename) and a prompt (the description of what you want generated).
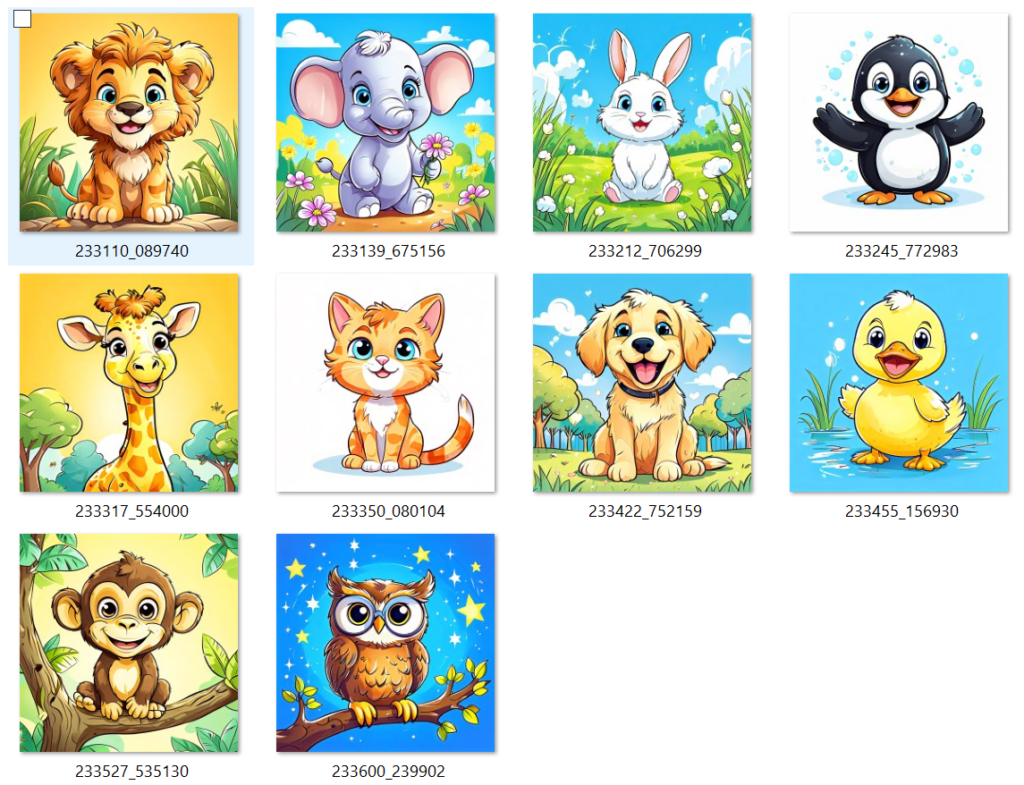
or example, if you’re creating a set of cartoon animal images for a kids’ educational video, your list might include entries for a lion, an elephant, a rabbit, and so on — each with a detailed prompt describing the art style, the animal’s pose, expression, and background.
Download Everything as a ZIP File
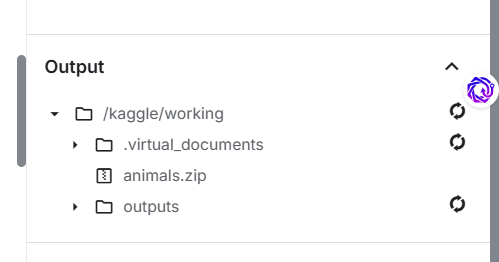
Once your batch finishes, the final cell bundles every generated image into a single ZIP file and provides a direct download link right inside the notebook. Click the link, and the entire batch downloads to your computer in one go — no need to right-click and save each image individually.
With this setup, you now have access to a genuinely free, GPU-powered image generation pipeline that can produce dozens of images per session without any subscription costs or daily limits beyond Kaggle's generous weekly GPU allowance. Whether you're building out a content calendar for a YouTube channel, creating thumbnail assets, or just experimenting with AI art, this notebook gives you a solid, repeatable foundation.
Stop Writing Expressions Manually – Use This Free Script Instead
Are you tired of copying and pasting the same After Effects expressions over and over? Want to add professional animations like wiggle, pulse, and bounce effects without memorizing code? This free Expression Applier script gives you instant access to 18+ pre-built expressions with just one click.
Perfect for motion designers, video editors, and content creators who want to speed up their workflow and create stunning animations effortlessly.
What is the Expression Applier Script?
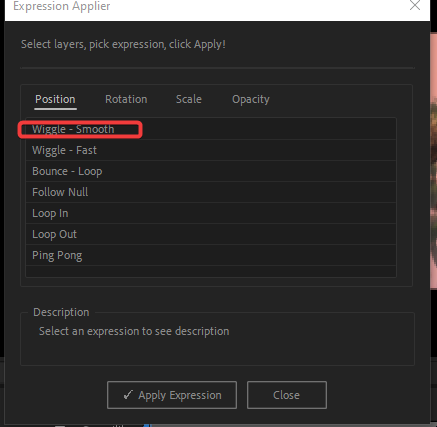
The Expression Applier is a free After Effects automation script that provides a library of commonly-used expressions. Instead of typing or copying code, you simply:
Select your layers
Choose an expression from the library
Click “Apply”
Done! ✅
Why You Need This Script
✅ Save Time – No more googling expressions or searching old projects ✅ No Coding Required – User-friendly interface for beginners ✅ 18+ Professional Effects – Wiggle, bounce, pulse, loop, and more ✅ Batch Apply – Add expressions to multiple layers at once ✅ Organized Categories – Position, Rotation, Scale, and Opacity tabs ✅ See Descriptions – Know what each expression does before applying
Ctrl/Cmd + D – Duplicate layer with expressions intact
Ctrl/Cmd + Shift + D – Split layer (expressions remain on both)
Frequently Asked Questions
Q: Does this work with After Effects 2024? A: Yes! Works with After Effects CC 2017 and all later versions including 2024.
Q: Can I use these expressions in commercial projects? A: Absolutely! These are standard After Effects expressions, free to use anywhere.
Q: Will expressions slow down my composition? A: Slightly, but modern computers handle these simple expressions easily. Audio reactive expressions are more intensive.
Q: Can I add my own expressions to the library? A: Yes! The script is customizable. Open the .jsx file and add to the expressionLibrary object following the same format.
Q: Do expressions export with my video? A: Yes! Expressions are “baked in” when you render. The animation becomes real keyframes in the final export.
Q: Can I remove an expression after applying? A: Yes. Select the layer, press E, then Alt/Opt+Click the stopwatch to remove it.
Q: What’s the difference between expressions and keyframes? A: Expressions are dynamic code that generates animation automatically. Keyframes are manual points you set. Expressions are easier for repetitive effects!
Q: Can I apply multiple expressions to one property? A: No, one expression per property. But you can apply different expressions to different properties (Position, Rotation, Scale, Opacity).
Q: Does “Follow Null” work with any null name? A: The default code looks for a null named “Controller”. You can edit the expression to use any null name.
Q: How do I make expressions loop a specific number of times? A: You’ll need to modify the expression code to add a time limit or counter. Check the “Pro Tips” section for examples.
Best Practices for Using Expressions
1. Name Your Layers Properly
Before applying expressions, use clear layer names:
❌ “Shape Layer 1”
✅ “Logo_Main”
This helps when expressions reference other layers.
2. Use Adjustment Layers for Global Effects
Apply expressions to adjustment layers to affect everything below:
Add wiggle to adjustment layer position = everything shakes
Add opacity flicker = entire composition flickers
3. PreCompose for Complex Setups
If you have many layers with expressions:
Select all layers
Right-click > Pre-compose
Apply expressions to the precomp Result: Easier to manage and faster performance
The Expression Applier script is a must-have tool for any After Effects user. Whether you’re a beginner learning expressions or a professional speeding up your workflow, having instant access to 18+ pre-built expressions saves countless hours.
Quick Summary:
✅ Free and easy to use – No coding required ✅ 18+ professional expressions – Position, Rotation, Scale, Opacity ✅ Apply to multiple layers – Batch processing saves time ✅ Organized interface – Tabbed categories with descriptions ✅ Customizable – Edit expressions after applying ✅ Works with all AE versions – CC 2017 and newer
What You Can Create:
🎬 Smooth floating animations
🔄 Perfect loading spinners
💓 Pulsing logos and text
🎵 Audio-reactive visualizers
✨ Glitch and flicker effects
🎯 Complex motion graphics
Stop wasting time searching for expressions online. Download the Expression Applier script today and speed up your After Effects workflow instantly!
Ready to supercharge your animations? Download the script above and start creating stunning effects in seconds!
Have questions or want more expressions added? Drop a comment below and let me know what effects you’d like to see!
Add Professional SRT Captions to Your Videos in Minutes
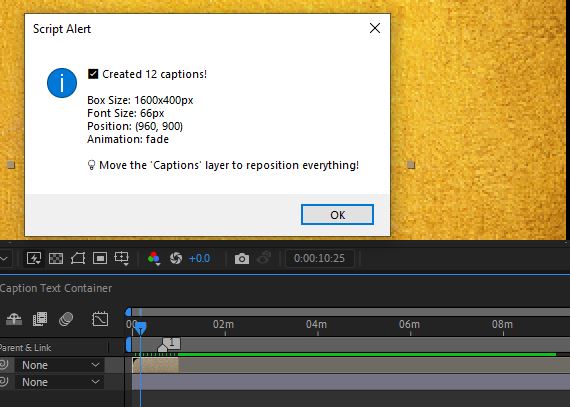
Are you struggling to add eye-catching captions to your videos? Whether you’re creating content for YouTube, Instagram, or TikTok, this free After Effects script makes it incredibly easy to import SRT files and create stunning animated captions that keep your audience engaged.
What is the Caption Creator?
The Caption Creator is a free After Effects script that automatically converts your SRT subtitle files into beautifully animated text layers. Perfect for:
Social media content creators
YouTube video editors
Punjabi language content
Music video producers
Educational content
Marketing videos
Key Features
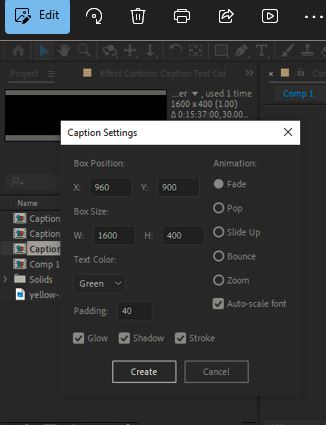
✅ Automatic SRT Import – Drag and drop your subtitle file ✅ 5 Animation Styles – Fade, Pop, Slide, Bounce, and Zoom ✅ Auto-Scaling Text – Font size adjusts to fit your box perfectly ✅ Customizable Effects – Glow, shadow, and stroke options ✅ Single Container – Move all captions together easily ✅ Bold & Readable – Enhanced text styling for maximum visibility
How to Install the Script
Step 1: Download the Script
Copy the script code to a text editor
Save it as srtmaker.jsx
Place it in your After Effects Scripts folder:
Windows: C:\Program Files\Adobe\Adobe After Effects [version]\Support Files\Scripts
Mac: /Applications/Adobe After Effects [version]/Scripts
Step 2: Enable Scripts in After Effects
Open After Effects
Go to Edit > Preferences > Scripting & Expressions (Windows) or After Effects > Preferences > Scripting & Expressions (Mac)
Check Allow Scripts to Write Files and Access Network
Restart After Effects
How to Use: Step-by-Step Tutorial
Step 1: Prepare Your SRT File
First, you need an SRT subtitle file. Here’s what it should look like:
1
00:00:01,000 --> 00:00:03,500
this is my fist video

2
00:00:03,600 --> 00:00:06,000
watch till last
i will approve the access when you send the request.
Conclusion
The Punjabi Caption Creator script is a game-changer for video editors working with subtitle files. In just a few clicks, you can transform plain SRT files into stunning, animated captions that boost engagement and accessibility.
Quick Recap:
✅ Install the script in After Effects
✅ Prepare your SRT file
✅ Run the script and configure settings
✅ Generate professional captions instantly
✅ Customize and export your video
Ready to create stunning captions? Download the script and start making your videos more engaging today!
FAQ
Q: Does this work with other languages besides Punjabi? A: Yes! This script works with any language supported by After Effects, including English, Hindi, Urdu, and more.
Q: Can I use this for commercial projects? A: Absolutely! This script is free to use for both personal and commercial projects.
Q: What version of After Effects do I need? A: The script works with After Effects CC 2017 and later versions.
Q: Can I change the animation after creating captions? A: Yes, you can modify animations by opening the precomp and adjusting keyframes manually.
Q: How many captions can this handle? A: The script can handle hundreds of captions. Processing time increases with more captions but typically stays under 1 minute.
Have questions or suggestions? Leave a comment below! Don’t forget to share this tutorial if it helped you create amazing captions.