How to Transcribe Audio for Free Using Whisper on Kaggle (No Third-Party Uploads)
If you make YouTube videos and need accurate subtitles, you don’t need to upload your audio to some random third-party website. In this tutorial, I’ll show you how I generate word-by-word, sentence-level, and karaoke-style subtitles completely for free, using a Kaggle notebook running OpenAI’s Whisper model — with everything staying under my control.
Why This Approach?
Privacy matters, especially if your audio contains anything sensitive or unfinished. Instead of sending your files to a third-party subtitle service, this method runs entirely inside your own Kaggle notebook. Your audio never leaves a platform you control.
Create a new dataset in Kaggle and upload your audio file to it. This keeps your file private and lets you swap it out later by simply bumping the dataset version.
Step 2: Run the Transcription Script
Here’s the full script. It uses stable-ts (built on top of OpenAI’s Whisper) to transcribe and align your audio, then exports three types of subtitle files.
import os
import glob
os.system('pip install -q stable-ts')
import stable_whisper

WHISPER_MODEL = 'large'
LANGUAGE      = 'en'
OUTPUT_DIR    = '/kaggle/working'

audio_files = (
    glob.glob('/kaggle/input/**/*.mp3', recursive=True) +
    glob.glob('/kaggle/input/**/*.mp4', recursive=True) +
    glob.glob('/kaggle/input/**/*.wav', recursive=True) +
    glob.glob('/kaggle/input/**/*.m4a', recursive=True)
)
if not audio_files:
    raise FileNotFoundError('No audio found in /kaggle/input')

AUDIO_FILE = audio_files[0]
print(f'Using: {AUDIO_FILE}')

import torch
device = 'cpu'
if torch.cuda.is_available():
    try:
        cap = torch.cuda.get_device_capability(0)
        if cap >= (7, 0):
            device = 'cuda'
        else:
            print(f'GPU capability {cap} too old, using CPU instead.')
    except Exception as e:
        print(f'GPU check failed ({e}), using CPU instead.')

model = stable_whisper.load_model(WHISPER_MODEL, device=device)
result = model.transcribe(AUDIO_FILE, language=LANGUAGE, word_timestamps=True, verbose=False)

base = os.path.splitext(os.path.basename(AUDIO_FILE))[0]
word_srt = os.path.join(OUTPUT_DIR, f'{base}_word_level.srt')
result.to_srt_vtt(word_srt, word_level=True, tag=('', ''))

sent_srt = os.path.join(OUTPUT_DIR, f'{base}_sentence.srt')
result.to_srt_vtt(sent_srt, word_level=False)

print('Done! Files saved to /kaggle/working')
Step 3: Pull Your Output
Once the kernel finishes running, use the Kaggle API to pull your output files directly to your computer:
Bring the exported SRT files into your video editor (CapCut, Premiere, etc.) to add synced captions to your video.
Wrap-Up
That’s it — accurate, free subtitles without ever handing your audio to a third-party website. If you found this useful, subscribe for more tutorials like this.
Add Professional SRT Captions to Your Videos in Minutes
Are you struggling to add eye-catching captions to your videos? Whether you’re creating content for YouTube, Instagram, or TikTok, this free After Effects script makes it incredibly easy to import SRT files and create stunning animated captions that keep your audience engaged.
What is the Caption Creator?
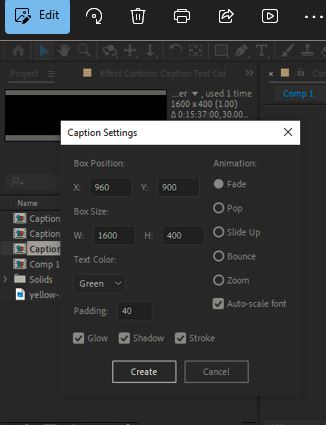
The Caption Creator is a free After Effects script that automatically converts your SRT subtitle files into beautifully animated text layers. Perfect for:
Social media content creators
YouTube video editors
Punjabi language content
Music video producers
Educational content
Marketing videos
Key Features
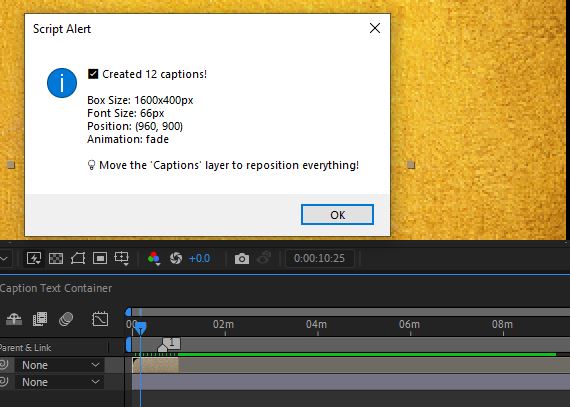
✅ Automatic SRT Import – Drag and drop your subtitle file ✅ 5 Animation Styles – Fade, Pop, Slide, Bounce, and Zoom ✅ Auto-Scaling Text – Font size adjusts to fit your box perfectly ✅ Customizable Effects – Glow, shadow, and stroke options ✅ Single Container – Move all captions together easily ✅ Bold & Readable – Enhanced text styling for maximum visibility
How to Install the Script
Step 1: Download the Script
Copy the script code to a text editor
Save it as srtmaker.jsx
Place it in your After Effects Scripts folder:
Windows: C:\Program Files\Adobe\Adobe After Effects [version]\Support Files\Scripts
Mac: /Applications/Adobe After Effects [version]/Scripts
Step 2: Enable Scripts in After Effects
Open After Effects
Go to Edit > Preferences > Scripting & Expressions (Windows) or After Effects > Preferences > Scripting & Expressions (Mac)
Check Allow Scripts to Write Files and Access Network
Restart After Effects
How to Use: Step-by-Step Tutorial
Step 1: Prepare Your SRT File
First, you need an SRT subtitle file. Here’s what it should look like:
1
00:00:01,000 --> 00:00:03,500
this is my fist video

2
00:00:03,600 --> 00:00:06,000
watch till last
i will approve the access when you send the request.
Conclusion
The Punjabi Caption Creator script is a game-changer for video editors working with subtitle files. In just a few clicks, you can transform plain SRT files into stunning, animated captions that boost engagement and accessibility.
Quick Recap:
✅ Install the script in After Effects
✅ Prepare your SRT file
✅ Run the script and configure settings
✅ Generate professional captions instantly
✅ Customize and export your video
Ready to create stunning captions? Download the script and start making your videos more engaging today!
FAQ
Q: Does this work with other languages besides Punjabi? A: Yes! This script works with any language supported by After Effects, including English, Hindi, Urdu, and more.
Q: Can I use this for commercial projects? A: Absolutely! This script is free to use for both personal and commercial projects.
Q: What version of After Effects do I need? A: The script works with After Effects CC 2017 and later versions.
Q: Can I change the animation after creating captions? A: Yes, you can modify animations by opening the precomp and adjusting keyframes manually.
Q: How many captions can this handle? A: The script can handle hundreds of captions. Processing time increases with more captions but typically stays under 1 minute.
Have questions or suggestions? Leave a comment below! Don’t forget to share this tutorial if it helped you create amazing captions.